Let me be straightforward and tell you that this blog is a review on the award-winning user interface of Luminar Neo.
This post may contain affiliate links, which means I’ll receive a commission if you purchase through my links, at no extra cost to you. Please read full disclosure for more information.
A Little Personal Background
Since I’ve delved into photography, my number one go-to photography editing software has been Lightroom Classic.
At the end of the day, I’m old school when it comes to working with photo or video editing software. Meaning, I like to work on a desktop, at home, locked up in an office by myself.
Ok, maybe “locked up” is a bit dramatic, but you got my drift.
After doing my typical research as a beginner photographer, it quickly became clear to me that Lightroom was the way to go. It’s the industry standard when it comes to photo editing. But also lives up to the hype.
However, at the time when I first started my photography journey, my biggest dilemma was trying to figure out which Lightroom to invest in.
As I mentioned before, because of my preference to work on a desktop when it comes to photography editing, I went with Lightroom Classic and truth be told, I have not regretted it ever since. It has lived up to its reputation.
BUT recently, and I mean, we’re talking in the past several months, I’ve had the opportunity to experience another photography editing software. And to say it’s blown my mind, is a complete understatement.
So here’s introducing… Luminar Neo and all the reasons why I think it’s worth considering.

What is Luminar Neo?
First, you’re probably wondering, what is Luminar Neo?
Why, I’m glad you asked.
Luminar Neo is an editing software that is powered with and by ai tools. Ai being artificial intelligence.
If you haven’t heard by now about ChatGPT, then you might be living under a rock. ChatGPT is an artificial intelligence chatbot produced by OpenAI.
AI is the newest thing since sliced bread. The thing is, AI has always been out there, but is just now becoming widely known as a tool for the masses in various methods.
Luminar Neo is no different but just focused to the photo editing world.
We’re talking powerful editing tools coupled with all the forms of editing that professional photographers use and need on a consistent basis.
Not only is it easy to use, but it’s ai-powered tools are compatible with the industry standard of Adobe Photoshop and Adobe Lightroom. This allows the user to continue using the editing platform they’re comfortable with but enhanced with this new software to produce a seamless editing process and truly unique final image.
Luminar Neo vs. Luminar AI
Something to note is that Skylum had a software called Luminar AI before Luminar Neo. It’s confusing because it seems that users interchange these names all the time.
But Luminar AI is also an artificial intelligence-based software introduced by Skylum, that was really the first of its kind to be presented. It too simplified the editing process so photo editors could make complex adjustments at a greater ease than Adobe Photoshop or even Lightroom.
But right now, the push has been for Luminar Neo, which “boasts a new engine, incredible AI tools, and a more intuitive workflow compared to Luminar AI.”
However, while it’s the most touted of the Skylum family of products, the Skylum team says they will continue to develop their initial softwares of Luminar AI and Luminar 4.
Supposedly, Luminar AI was discontinued in October 2022.
As for Luminar 4, I couldn’t tell you much about it. In my research on the background of Luminar Neo and these preceding forefather softwares, I have not been able to find much information on either.
And if you find a link to take you to Luminar 4 or Luminar AI, it ends up directing you to Luminar Neo.
For the sake of this discussion, I’d just recommend you focus your energy and investment into Luminar Neo. It seems to be the only software that Skylum is offering and with its host of features, extensions, and other ground-breaking AI tools, will be tough to beat within its category.

You can see a breakdown comparison of the features offered by Luminar AI (if it’s still available or if you have this version before Luminar Neo came out) versus Luminar Neo.
What is Skylum?
Now, you’re probably wondering, “what is Skylum?”
At least I did.
See, when I delve into a new software or camera or any other video or photo relevant equipment, I want to know everything about it.
My approach to Luminar Neo was the same.
Skylum is the force behind Luminar Neo.
The Skylum Team is the body of people that work together to create apps that are truly innovative and provide solutions for photographers and creative photography.

They started as two co-founders in 2009 and were first known by the name of Macphun Software. Years later, they stream-lined the focus of their company, grew into an international body and changed their name to Skylum.
Therefore, you can think of Skylum as the producer and creator of Luminar Neo, but essentially, they are Luminar Neo because they birthed this creative baby.
In short, Luminar Neo is Skylum software.
AI in Photo editing
Let’s talk about the use of AI in this software.
The beauty of Luminar Neo is that it uses AI features to play a significant role in their editing tools. This creates advanced features that are easy for a photographer of any level to use. It truly is a user-friendly interface.
To really see the easy way the power of AI is exhibited in the features of Luminar Neo, we have to discuss some of its different types of editing tools.
Mind you, we can’t discuss all 30+ options available but we’ll focus on those that many of us will need in our photo editing.
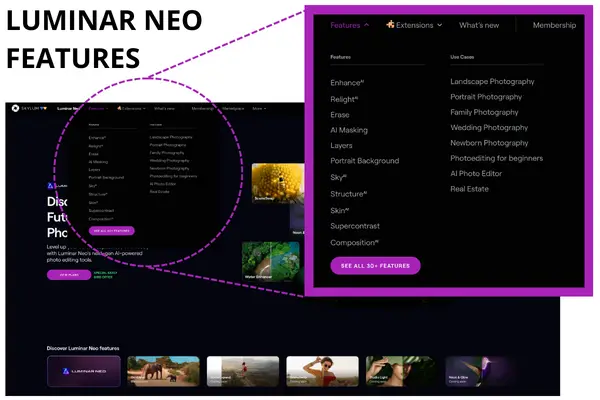
A Closer Look at the Different Types of Luminar Neo Editing Tools
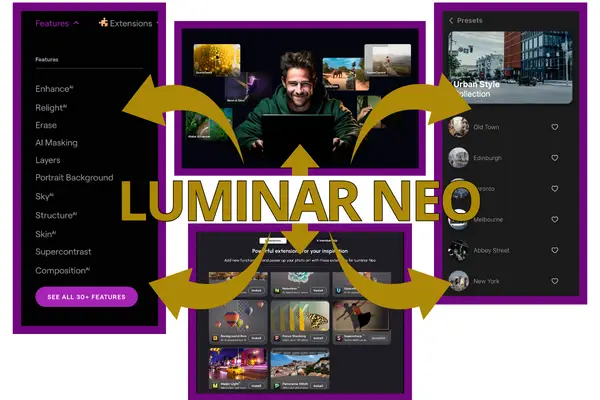
Skylum’s Luminar Neo offers a host of features that provide you with the ability to easily perform complex edits to your images.
Let’s talk about a few of them.
One of the most commonly mentioned edits I hear about in photo (and video) editing, is “sky replacement.”
Now for someone who does a lot of portrait photography, lifestyle photography and other family-oriented photography (featuring people, i.e. maternity sessions), this may not be as relevant to you.
For landscape photographers, architecture photographers, street photographers, this is a powerful tool you must know about.
Sky AI is the title of this AI tool in Luminar Neo.
The beauty and simplicity of this feature is that with just one click of a button, you can replace the sky within your image.
But this is not the best part about Sky AI.
No, my friend.
Not only can you perform sky replacement with a single click, the powerful tool of this ai technology is multiple. It not only analyzes the sky in your image, but identifies its position and then replaces it.
It also will automatically adjust to account for:
- Its reflection in water.
- Relighting the scene of your image.
- Blending with your image.
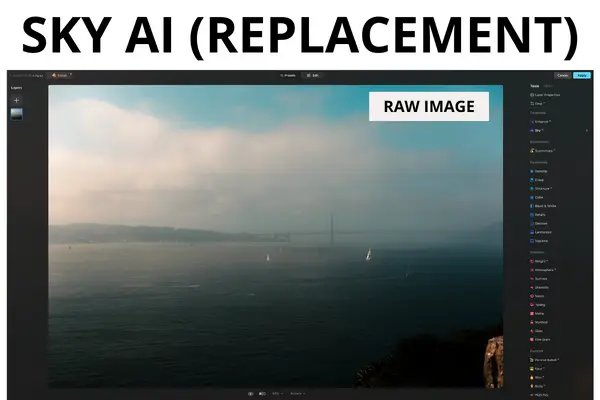
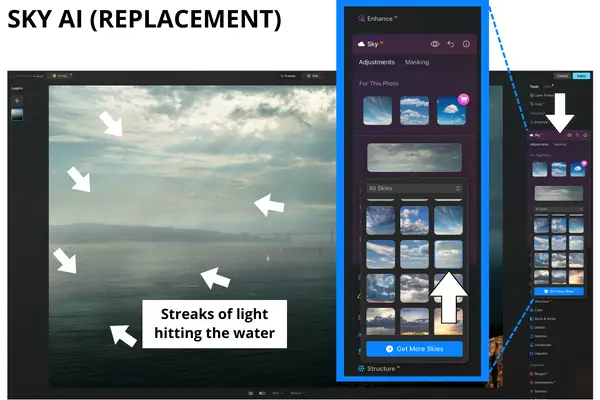
In addition, you have the choice of selecting what you believe is the right type of sky from Luminar Neo’s built-in catalog. Or, import an image of a sky into the scene.
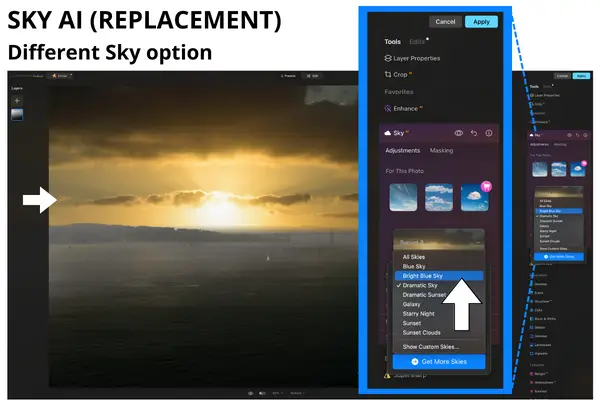
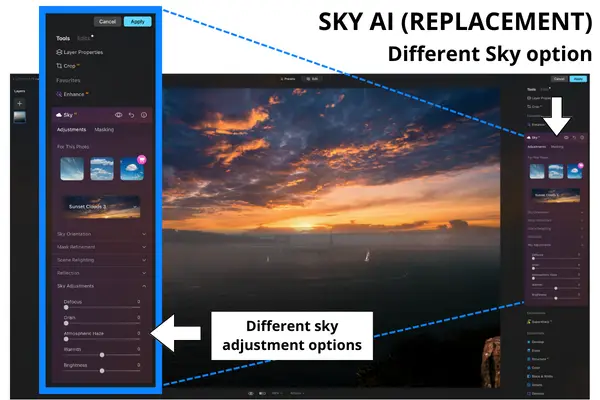
Luminar Neo also does a fantastic job of giving the photo editor creative control while at the same time making what would be hard work in another editing software, like Adobe Photoshop, easier to do.
We’ll get into some example videos of the comparisons with Lightroom and Adobe Photoshop shortly but for now I’ll just say that those platforms do provide AI options for sky replacement now. And likely will continue to improve that technology to be competitive with platforms like Luminar Neo.
But Skylum’s Luminar Neo gives the user precise control with a simple slider button within Sky Orientation, Mask Refinement and Sky Adjustments tabs, to name a few options.
We’re talking about technology that can potentially even the playing field when it comes to a complex edit between beginners and advanced users.
Can you say, “game-changer?!”
To see this in action, check out this comparison by PiXimperfect. They show you what can be done with Luminar Neo’s Sky AI feature.
Anywho, moving on.
Structure AI
Now for Structure AI, this thing is beast.
It provides detail and clarity to your image with simple slider adjustments to Amount and Boost.
You can also do the opposite and make your image more smooth with the same slider controls, but just going in the opposite direction.
Masking is an option within the Structure AI as it is with many of the other tools. This is a great method that allows you to use a brush, linear or radial gradient, or Mask AI to select specific parts of your image to apply the selected feature to.
The brush, linear gradient and radial gradient are similar to Lightroom’s mask options. Meaning, you can use the brush to paint over specific areas you want to apply your selected edit tool to, in this case, the Structure features. You can apply a linear gradient or radial gradient to apply the selected feature to.

But the Mask AI of the Masking tool itself, is one of those new features that is mind-blowing to see. When you select this option, the ai technology of Luminar Neo starts to work.
You can see this by the moving geometric pattern that floats over your image.
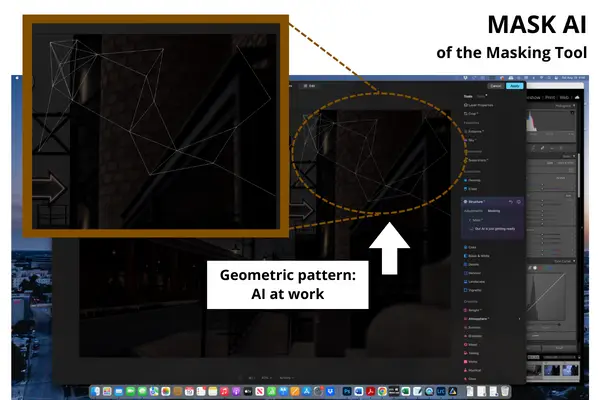
When it is done, it will separate your image into broad pre-masked categories.
For example, in this image of an empty street scene, the Mask AI created 3 masks from analyzing the image.
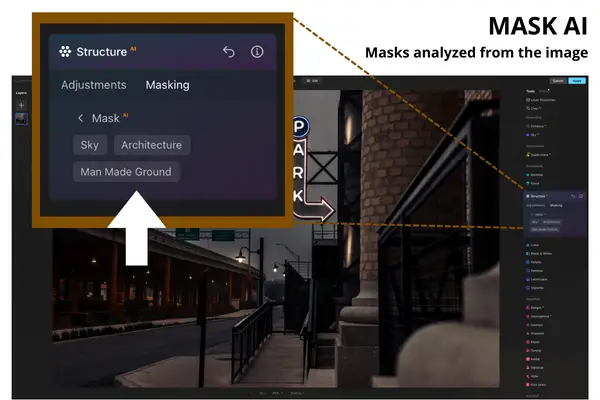
Sky, Architecture and Man-Made Ground.
By selecting any of those categories, that entire artificial intelligent-detected area in the image is automatically masked and will allow me to apply the enhanced detail and clarity edit to just that part of the image.
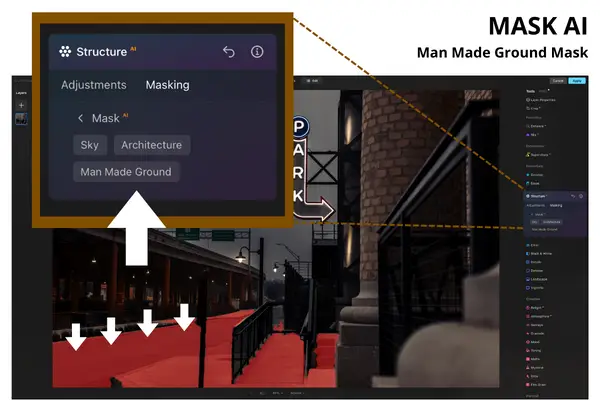
Ri.dic.u.lous.
And then, you can further edit those masked areas by using the Mask actions which provide options to Fill, Clear, Invert, Copy, Paste, and Show.
You can read more about the Mask Actions here, but for the sake of continuing with this general overview review, we’ll move on to another popular common feature.
Accent AI
The genius of Accent AI is experienced within Luminar Neo’s Enhance AI.
The Enhance AI takes what you and I would call the basic adjustments in photo editing and combines them into one single feature.
Bruh.
If this doesn’t have you hooked, then exit out the article and check out some of my other reviews.
But seriously! Isn’t that beast?!
See it for yourself.
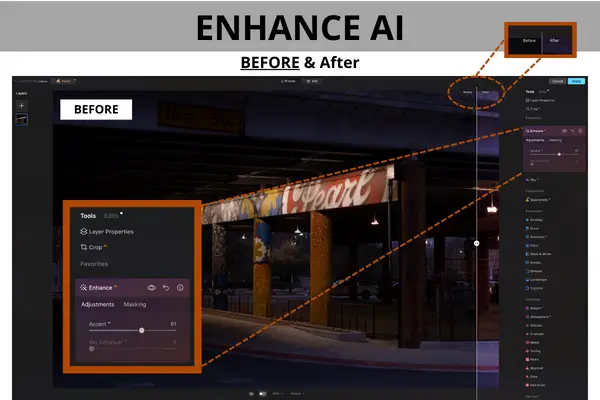
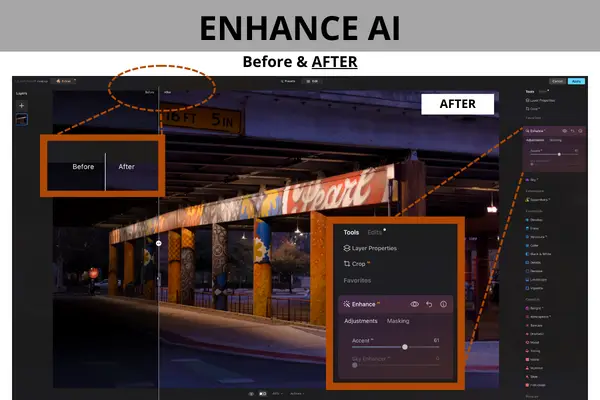
We’re talking about adjusting highlights, shadows, contrast, tone, saturation, exposure and more (up to a total of 12!) different controls with one slider.
When you start editing your raw image in Luminar Neo, Enhance AI and its Accent AI is a great starting point.
From there, you can adjust other features such as Relight AI or Skin AI.
Portrait Module
Speaking of Skin AI, for those portrait photographers out there, let’s talk about Luminar Neo’s Portrait edit options.
When you click into the Portrait module, you’ll see multiple sub-modules to further specify your portrait edits.
This includes the following:
- Portrait Bokeh AI
- Face AI
- Skin AI
- Body AI
- High Key
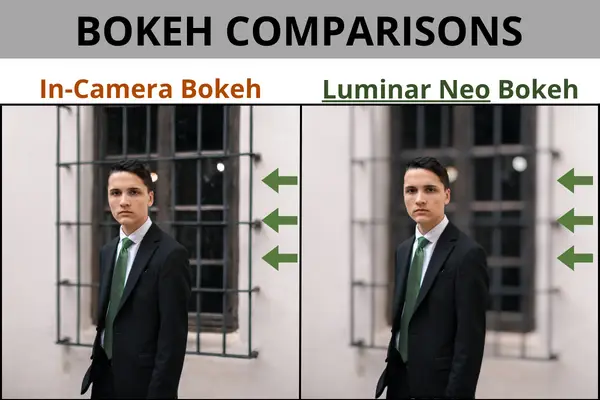
The Portrait Bokeh AI feature is one I find particularly fascinating. It allows you to enhance or even create a bokeh in your background to your desired effect.
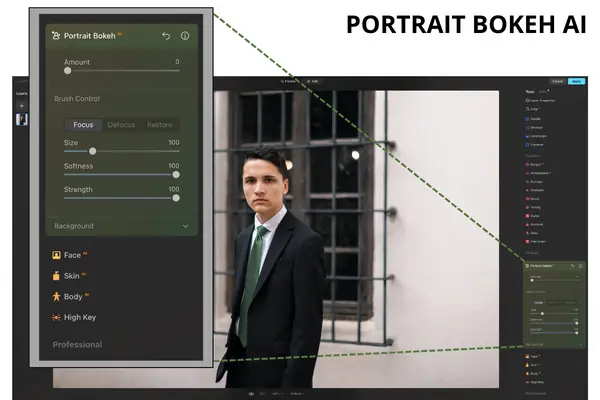
Say, for example, you have an image where you’d like to blur the background a little further, because the actual bokeh in your original image just wasn’t enough to your preference.
That could be for any reason. Perhaps a limitation of the lens you were using that day, or your error in adjusting the aperture during the shoot, etc.
But clicking on the Portrait Bokeh AI, it gives you the option of adding bokeh to your background at a high or low level of your preference. Simply by adjusting the slider on the Amount, you can add as much bokeh or as little bokeh to your background.
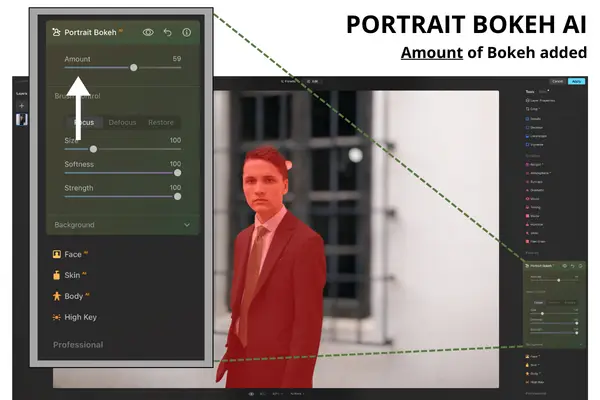
Then with the Brush Control option, you have the ability to further adjust where that bokeh is focused.
For example, if you have a part of your image where the focus on the person is mistakenly read by ai as being part of the bokeh, you can increase or decrease the size of the brush under Brush Control, make sure the Focus tab is selected and brush over that spot that needs to be in focus and NOT part of the bokeh.
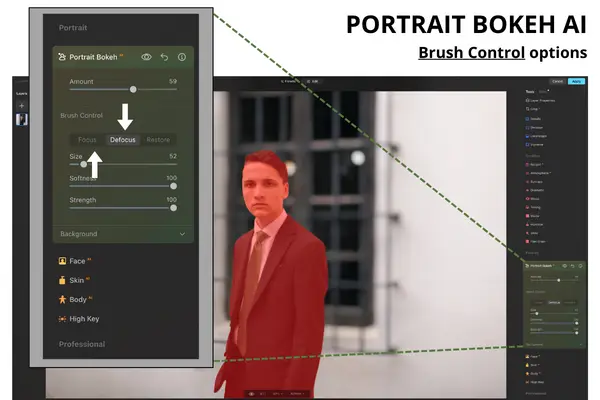
The same concept can be applied by using Defocus to brush over those areas you need to be blurred and included in the bokeh or Restore whatever part of the image you desire back to its original quality by brushing under Restore.
By using the further specific options under Background, you can further increase the depth of that bokeh with the Depth Correction slider to reach the subject for a further seamless contrast from portrait to bokeh background.
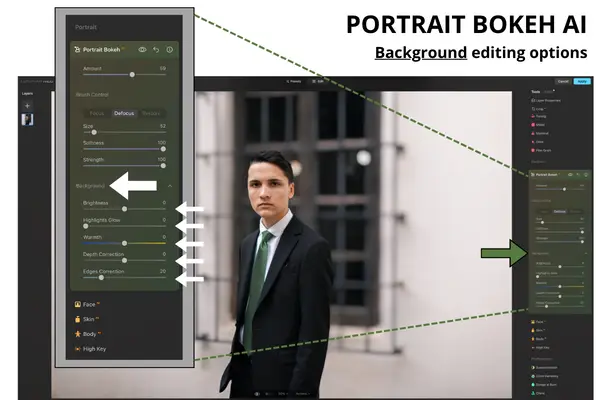
And then use the Edges Correction slider to fine-comb the edges of your subject to be smooth and sharp compared to blurred in with the bokeh background.
Furthermore, you can adjust the quality of that bokeh background to your liking with the Brightness, Highlights Glow, and Warmth sliders.
Now, we could continue to go step by step into every feature and sub-feature of all those options within Luminar Neo, but the focus of this blog is to provide you an overview of this software.
So to summarize, I would suggest exploring these features by clicking on the information icon within each feature.
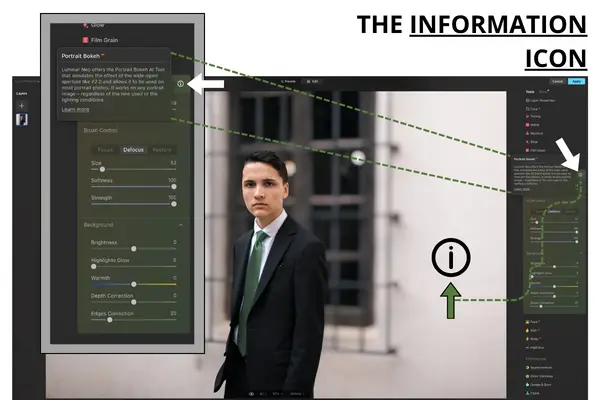
It will tell you what exactly the feature can do and even take you to a specific tutorial on that feature to educate you on how to use it in your photo editing.
The Skylum team has really went out of their way to try to think of everything!
Issues & Bugs
Now, while many of these features are great, they are not perfect.
To be honest, no software is.
But this should be expected given the main objective of this software is to provide photographer editors of all skill levels the ability to create complex edits with ease through artificial intelligence.
Thus, every image produced through Luminar Neo will be an ai-powered photo.
Let’s discuss some of these limitations that are also applicable in a general sense to more than one editing feature in Luminar Neo.
AI detection & Correction Issues
One of the general issues I’ve noticed with Luminar Neo is that, surprise, surprise, it’s not perfect.
Let’s keep this real. When it comes to having a photo-editing software that can do everything for you and take away the need to actually edit… that is unrealistic.
While Luminar Neo can do a great job with its AI abilities, it misses the mark on some things.
For example, with the Remove Powerlines feature, under the Erase tool, it does an okay job but definitely is not perfect. Sometimes you have to spend time trying to finetune and tweak what you need it to erase when it may be easier to just do this manually yourself in Photoshop.
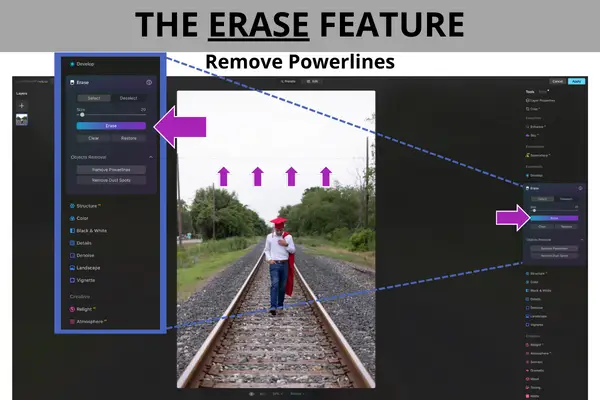
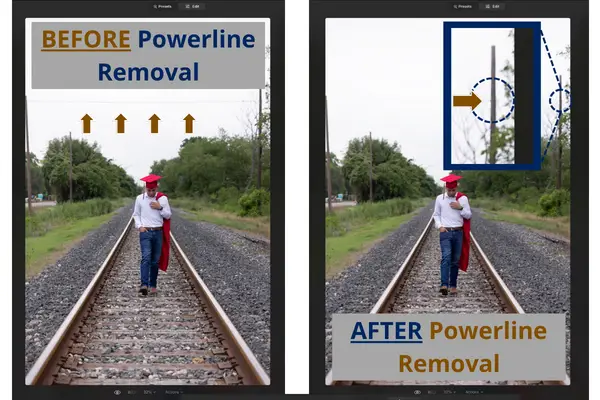
As you will find as you continue reading, one of my issues with Luminar Neo is relying on the AI to apply what it thinks is the best level of “correction” to the image as opposed to my preference on how much correction should be applied.
Specifically, when it comes to choosing between 3 and only 3 levels of adjustment in some of the extensions, it takes some much-needed control away from the user on how much correction in editing, to apply to an image, regarding certain needs.
But I digress. We’ll hit on this more in discussing the Pro Supersharp AI extension.
Masking & Mask AI Limitations
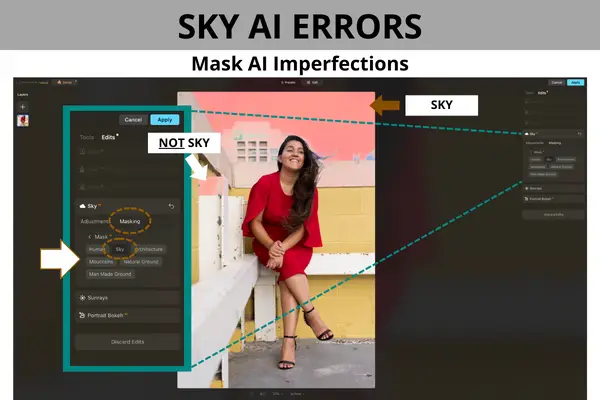
When using the Mask AI feature within the Masking option, I’ve noticed that the generalized categories the AI detects and then creates can be hit and miss. It does a pretty good job with detecting the sky, man-made ground, human being, etc.
But if the colors in your image are similar to any of the created categories specified in Mask AI, it will mistakenly link them into that category.
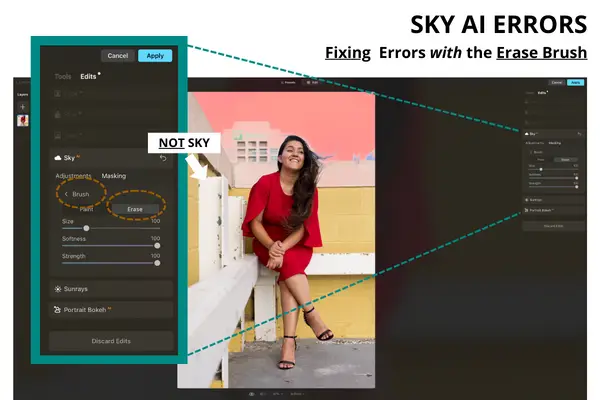
For example, this portrait shows Mask AI detecting most of the sky but also some of the architecture and building as part of the sky as well.
The beauty is you can access the Erase tool in the Brush Masking option and erase that part of the Sky Mask AI subgroup that is incorrectly included in the Sky category.
Supersharp AI Limitations
The Supersharp AI tool is an extension that can be purchased or selected to be installed after you’ve made your purchase of Luminar Neo, depending on which subscription you have.
Now, I’ve used this the most with portraits so my discussion of its limitations will be specified to the aspect of the Face Enhancer AI.
Sometimes in photography, despite doing your best to maintain focus of your subject, you’ll find in post that you wished your subject’s face was a little more in focus or sharp than what you captured.
I’ve used this feature to try to correct that in some of my portraits and where I’ve found limitations on the quality of this tool.
The Pro Supersharp AI extension tool does not provide the user with the slider control as in the other tools that come with Luminar Neo by default.
Instead, it heavily relies on AI to do the work for you and limits your control of how much the AI edits with 3 options: Low, Middle, and High application levels.
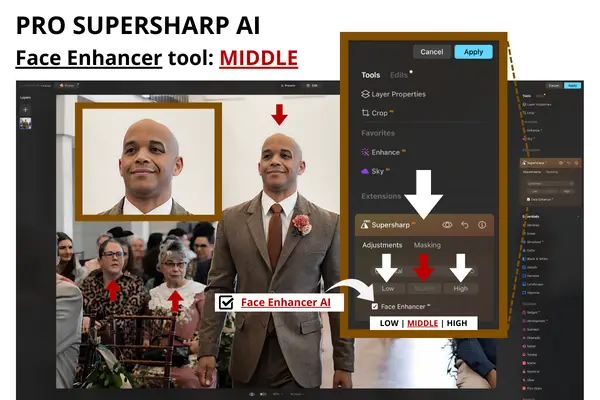
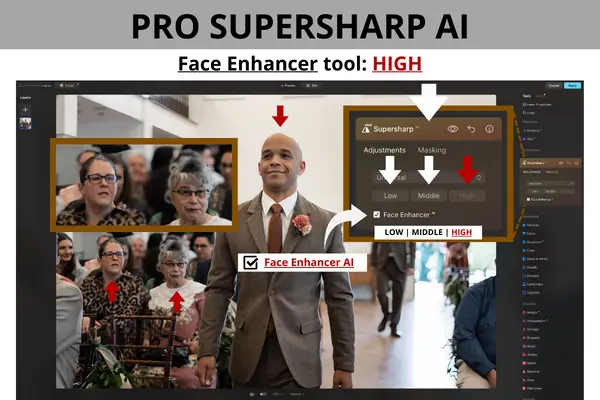
For portraits, you have the option of checking the Face Enhancer AI. When I’ve used this in several images, I’ve found that many times the results, no matter which level of adjustment I select, seems too artificial.
And the higher the quality of adjustment, the more unnatural and different my subject looks than the original image.
You can see it in this following example.
This was a wedding shoot for my client. First, is the original raw image. It has not been edited or altered in any way, shape or form.

I used the Pro Supersharp AI Face Enhancer option to try and restore some sharpness to the image to compensate for the blur that is present.
*Side Note: to those wedding photographers out there shooting for brides who don’t have an actual wedding coordinator. Instruct the brides to tell their wedding party to walk slowly down the aisle!
This wedding party walked so fast, it was like they were running down the aisle to the their positions. Just kidding.
But seriously, they walked so quickly, I was not able to adjust quickly enough in the beginning to compensate for potential motion blur. So, this particular example we’re going to use does have some motion blur of the subject instead of being in complete sharp, focus.
As you can see, the lower the quality of the correction I used, the better the quality of the result.
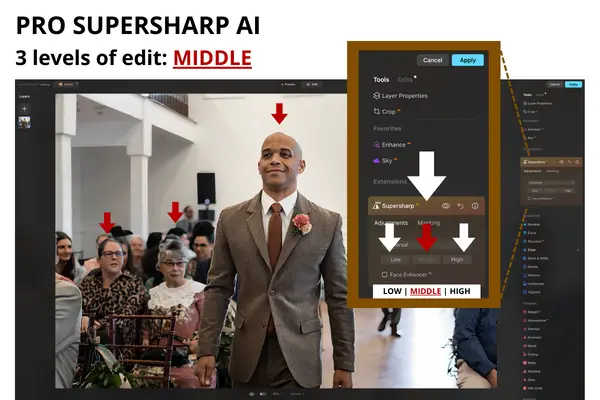
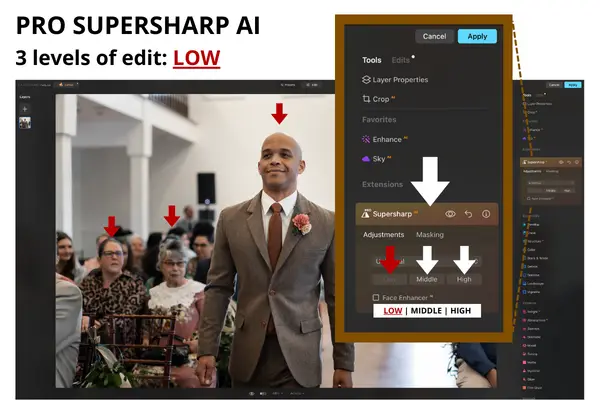
But the greater the correction, the more fake and almost unnatural the subject looked.
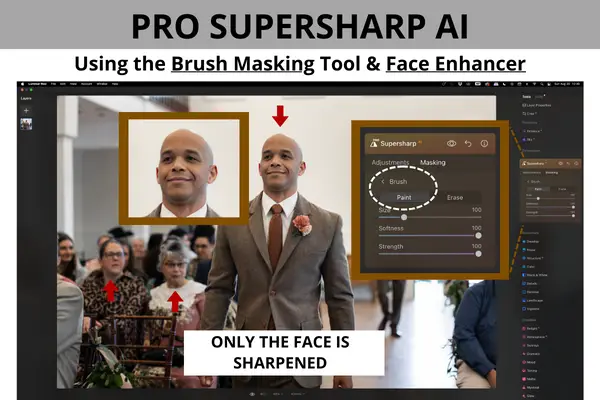
In addition, I had to figure out what would work in keeping the application of the Pro Supersharp AI extension centered on the subject in the middle and not everything else in the image. Using the brush tool under the Masking options, helped me to hone the correction to just his face.
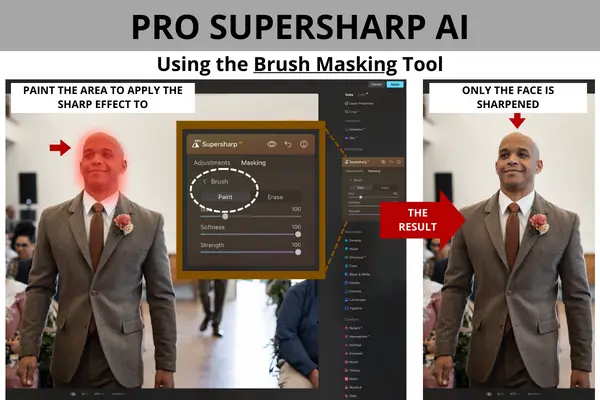
And further, I was able to see that not using the Face Enhancer selection made it seem more realistic than when I had that option selected.
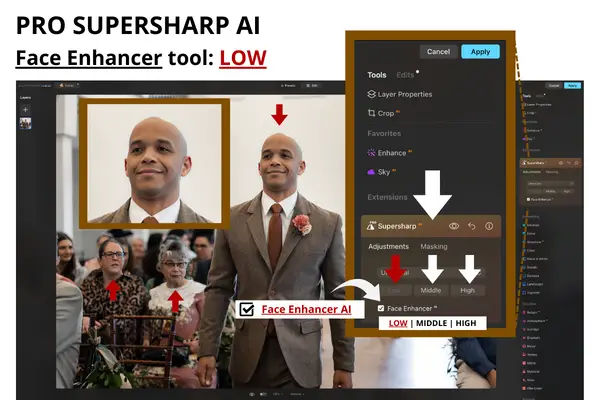
In short, what I have found that works is using these editing tools for images where only a little adjustment is needed. The greater the adjustment needed, the more artificial the result will be.
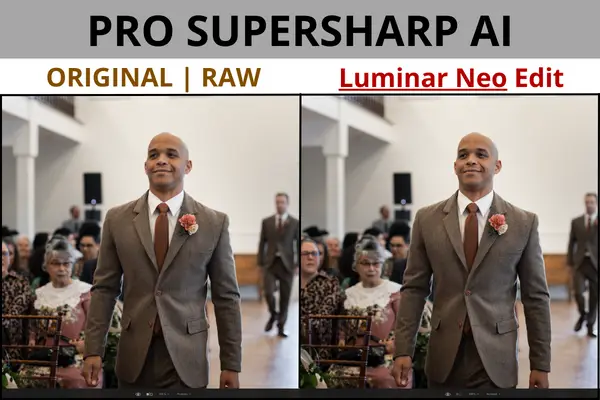
So subtle changes and small changes with this editing software are going to give you the best results.
In general, just keep in mind that you always want to try to shoot with the focus as sharp as it can be in real time. Actually, any of your settings are exactly as you need them to be in the moment.
This means taking your time to adjust your camera and lens settings as needed during the shoot, because trying to compensate after the fact for sub-par adjustments is always more difficult, time-consuming and tentative.
You’ll always be taking a risk to “correct something later” with editing because it may or may not be done to the level of quality you need and the result will likely have an element of looking artificial.
Again, because I’ve used Luminar Neo thus far, primarily with portrait photography, my discussion is focused on the portrait application of this editing tool.
The Skin AI tool is a great feature that uses ai to analyze your image and then automatically enhance and retouch the skin.
You’re able to further hone that editing to specific areas in your image by using the Masking options and touching up specific areas that you want to perfect beyond the AI’s ability.
One key principle I’ve learned in exploring Luminar Neo’s features, is to optimize your results by using the tools most appropriate for what you need.
For example, I was getting frustrated with the Skin AI feature because I thought it would completely remove all the blemishes in my subject’s skin.
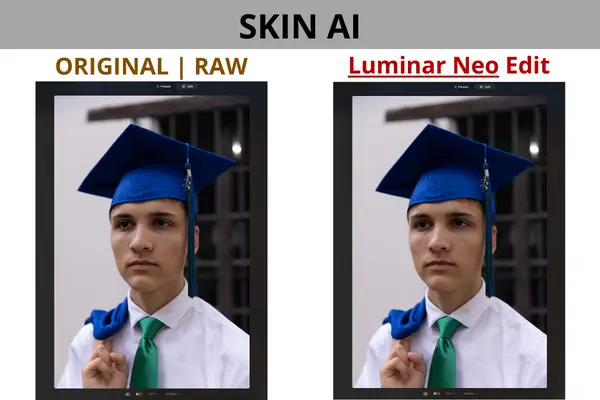
However, when I used the Erase tool to spot remove blemishes, then went back and used the Skin AI feature for the overall retouch, I was extremely happy with the results.
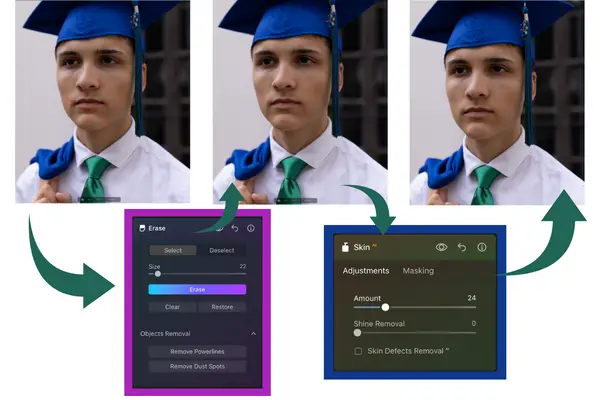
This is key to keep in mind throughout your use of Luminar Neo.
Storage/Organization Issues
Now one of the biggest arguments comparing Lightroom to Luminar Neo seems to center around the storing and organization abilities of Luminar Neo.
Lightroom is created to not only edit your images but to also store your raw images and edited images within a “catalog.” The software is created to optimize your ability to store and access your footage to coordinate directly with Lightroom in a variety of ways. You can read more about that importing photos and storage process in Lightroom, here.
Luminar Neo on the other hand, gives you options to store edited images in a Luminar Neo catalog. In their user guide, they succinctly break down the various ways to open images for editing within the software. But the key difference to catch here is the fact that you’re not storing your raw files within Luminar Neo.
It quite clearly lists out that you can open the images you need to edit within Luminar Neo by using the “add folders” option, import the images from a memory card or external drive or individual images from any location.
What I have found to be lacking and honestly, a little confusing with Luminar Neo is the inability to import images directly from your memory disk. Instead, moving images from a memory disk onto another hard drive first, and then importing them into Luminar Neo is what actually works. This or importing them from another software, i.e. using Luminar Neo as a plugin, is the best method.
However, this hard drive needs to remain connected to your computer if you want to continue using Luminar Neo to edit those images.
Meaning, you need to have these images you plan on editing within Luminar Neo, stored somewhere other than Luminar Neo. If you don’t, then when you import images from your external drive, and then remove that memory card or external drive from your computer and thus Luminar Neo, you will lose those images within Luminar Neo as well. The files will appear to be “missing.”
Depending on your purposes of using Luminar Neo’s catalog, this may be a huge plus for you or a huge negative.
Personally, I use Luminar Neo as a plugin to Lightroom Classic, so it does not bother me about this storage issue.
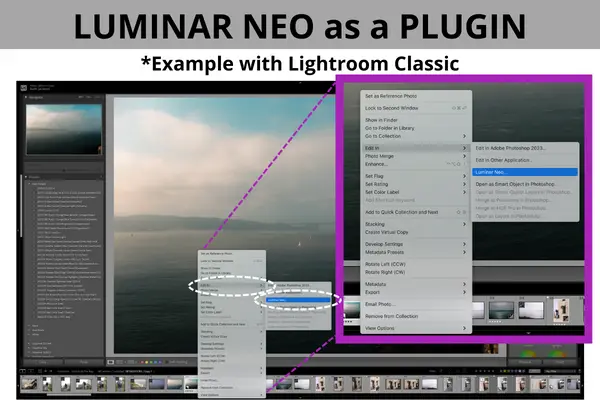
But for those photographers that may be using or wanting to use Luminar Neo as their sole photo editing software, this needs to be taken into account so you don’t lose images that you’ve worked hard to obtain and edit.
With that being said, let’s discuss the compatibility of this software with other photo editing softwares.
Compatibility with other software
One of the great positives about Skylum’s Luminar Neo is its ability to plug into software that you already use.
For many, Adobe’s Lightroom or Photoshop is their main editing software.
For many, like myself, Lightroom Classic is my main stomping ground. However, I will commonly use Photoshop as a plugin and take a photo I started editing in Lightroom into Photoshop to do some fine detail editing that I’m unable to do as well in Lightroom.
You are able to do the same with Luminar Neo.
Simply just right click within Lightroom Classic to view the “edit your photo in” option and then select Luminar Neo, and boom. You’re able to edit what you need in Luminar Neo and export that out as a final image.
This thing works as a plugin with both Photoshop and Lightroom. Furthermore, you can also use it on both Windows and MacOs, which is major for those diehard PC users vs. Mac users. I’m of the latter category myself.
Whatever your flavor of choice is, having this available as a standalone software or as a plugin is a huge advantage when deciding to invest in this.
Costs
If what you’ve read so far has you hooked, then you’re probably wondering how much does Luminar Neo cost?
Let’s discuss the different purchasing options for Luminar Neo.
There are two basic options. The Lifetime license and the Pro Subscription option, which the Pro Subscription option comes in a monthly subscription and or yearly payment plan.
The main differences to consider between the two is that the Lifetime license limits your lifetime access to 1 computer use and though it does allow for performance and stability updates for the platform, you will have to pay extra for the extension options.
However, with the Pro Subscription, you’re able to use Luminar Neo on at least 2 computers and have immediate access to new extensions as they are released throughout your subscription agreement. There are other benefits as well, but keep in mind this is a subscription that has to be renewed from year-to-year.

Now when we say extensions, we’re talking about additional features that are released as Skylum creates new editing tools to enhance your photo editing capabilities.
Most recently, at least at the time that this blog is being written, they’ve released the following:
- HDR Merge
- Noiseless AI
- Background Removal AI
- Upscale AI
- Focus Stacking
- Supersharp AI
- Magic Light AI
And most recently, they have the Panorama Stitching extension coming soon.
These, my friends, are ridiculous AI features that continue to support the reputation that Luminar Neo has gained in simplifying complex editing skills for even a basic, beginner photo editor.
Known as their Extensions Pack, you can read more about each extensions specific goals and how to use them in your editing here.
My Thoughts: Should you invest?
In summary, this is what I think.
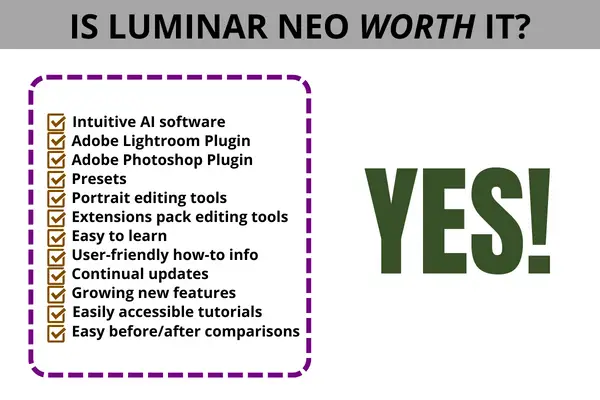
No matter what skill level you may be at, Luminar Neo offers you the ability to quickly use and develop your editing skills with the support of AI technology.
For beginner photography editors, this gives you the opportunity to produce amazing results quickly compared to a time-consuming learning curve if you’re starting out in Photoshop or Lightroom.
However, this software does have its own learning curve that you have to take into consideration. But it doesn’t take that much time and being able to produce complex edits with ease is a huge advantage in expediting quality to your results.
Nonetheless, as is the issue with most software that are AI-based, you put yourself at risk with your images looking too artificial.
Of course, this is subjective. It really depends on what you feel looks best. Personally, I’m a huge fan of keeping a realistic quality to my images and try to stay away from adding too much editing where it looks unrealistic and more fake.
And no, it is not the perfect editing software. It does have its flaws and areas needing improvement but…
Is it worth investing in?
AB.SO.LUTE.LY.
This is my honest opinion as a photographer who uses primarily Lightroom Classic for editing.
For the price, even with the annual subscription, there are enough features there that will provide an efficiency and quality to your workflow that you won’t obtain with just Lightroom or Photoshop by itself.
The Erase, Sky AI, and the Portrait features are all musts for me that help me correct issues that I have a hard time doing in Photoshop.
Even though I may not use Luminar Neo as much as Lightroom Classic, I know I’ll be using it regularly as a plugin and with its constantly expanding repertoire of new extensions available, know there will be more features I’ll need to use that I won’t be able to find elsewhere.
And that, ladies and gentlemen, makes it worth the investment.
To conclude, here are my top tips for getting the best use out of Luminar Neo.
TIPS
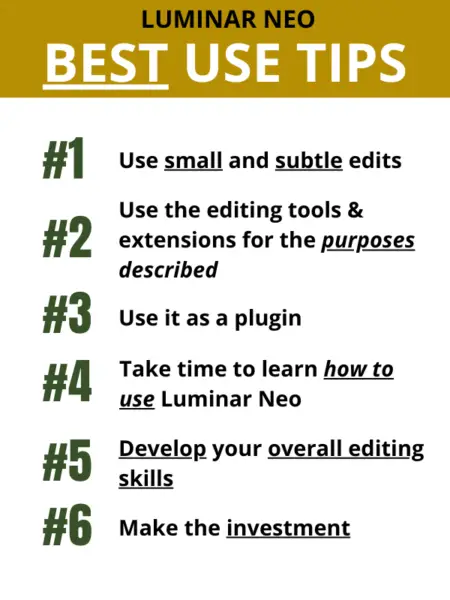
#1 Apply edits with small and subtle changes.
#2 Use the editing tools and extensions for the purposes described as the intention of that tool.
For example, I found the best results in removing unwanted skin blemishes in portrait shots by using the Erase tool under the Essentials dropdown menu as opposed to the Skin AI tool.
#3 Use Luminar Neo as an adjunct to your main photo editing software.
This is key for storage and organization of your files, and optimizing your photo editing workflow.
#4 Take the time to learn how to use Luminar Neo.
Experiment with its tools. Read on how to use its tools. You’ll find it can add significant quality to the editing results of your image if you use it the right way.
#5 Do not substitute Luminar Neo’s AI abilities for your shortcomings in other standard editing softwares like Lightroom and Photoshop.
The editing skills you obtain with using those softwares will only enhance your ability to use Luminar Neo and optimize the quality of your results from using Luminar Neo.
#6 Invest in it. You will undoubtedly find more value in it than you would have originally thought and it will give you more options in the long run compared to those one-stop-shop apps that simply correct for one thing, i.e. the Remini app.
If you’re convinced, here’s my link to purchase and get an exclusive discount.


I save your post in my memory
Thank you, I’m glad it is helpful!
Good post, thank you! I recently bought a Luminar, so I will try the tips from you
Oh awesome, I hope it goes well, Luminar has interesting editing tools! Thank you for your feedback.
Great review! I appreciate how you broke down both the strengths and limitations of Luminar Neo in a clear, honest way. The examples you included really help show what the tools can do in real editing scenarios, especially with AI enhancements and creative enhancements. For photographers weighing different workflow options, this was a very helpful read. Thanks for taking the time to explain it so thoroughly!
Thank you for your feedback, glad it helped! Best wishes!