
Aperture
If you’ve started delving into photography, you’ve undoubtedly heard this term before. And probably still don’t understand what exactly it is or what it means.
For all the beginner photographers out there, this article is for you.
It really is not that complicated but may take repeat reads to really sink in.
What can also help is seeing it in action.
Meaning in video.
*Shameless Plug: In less than a year, I’ll be launching a short beginner photographer/photography course that will be tackling this concept (and others) in a simple way so you can easily learn and apply to shoot and edit your own photos.
If you think you’ll be interested in the pilot group which will be majorly discounted, go ahead and sign up for my subscriber list to get the notification when that course launches.
For now, I’m going to summarize this educational blog post on aperture for you in 5 concepts.
This post may contain affiliate links, which means I’ll receive a commission if you purchase through my links, at no extra cost to you. Please read full disclosure for more information.
Preview Summary:
What to Expect
The goal is to cover 5 basic principles to understanding aperture enough to manually adjust settings in camera as opposed to relying on auto features.
These will be broken down into the following:
#1 What is aperture and #2, why is it important?
#3 What do photographers mean by the “Exposure Triangle?”
#4 Exactly how does aperture work?
And
#5, how is depth of field related to aperture?
With these concepts, I’ll be giving you some examples to help you “see” what I mean.

Trust, this will be totally comprehensible by the time we’re done!
So, let’s get into it…
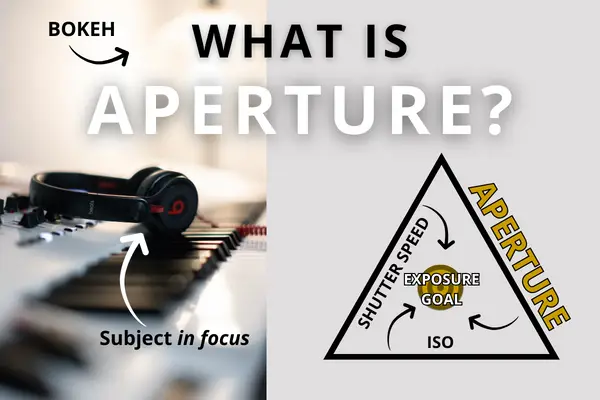
#1 What Is Aperture?
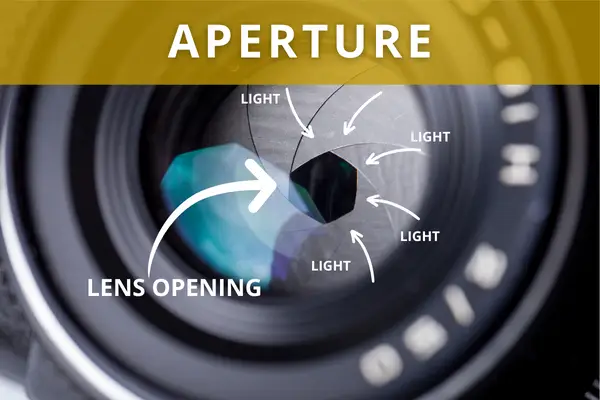
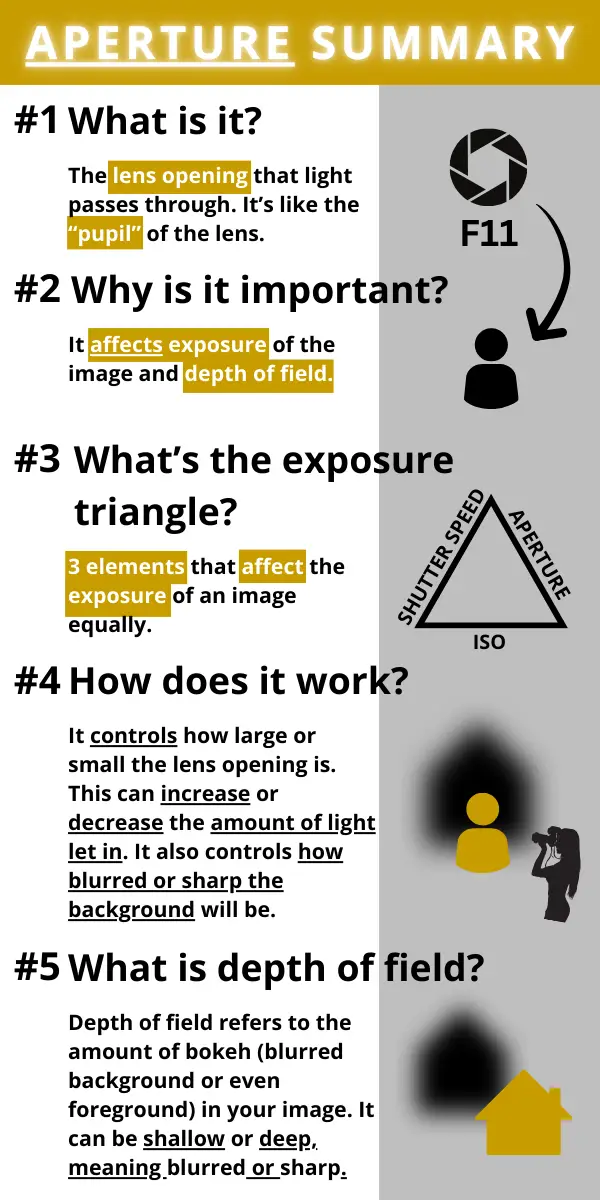
In simple language, aperture is the opening in a lens that light passes through.
To be fancy shmancy, the opening in a camera lens is called the “diaphragm” and this together with the amount of light passing through defines “aperture” in photography.
#2 Why Is Aperture Important?
Aperture is soooo important!
It is one third (1 of 3 parts) of the famed exposure triangle (get it? Triangle?!!) that is key to affecting how much light reaches your camera sensor.
Don’t worry. We’re getting into the exposure triangle next.
But let’s exhaust this principle a little more.
Aperture is the only part of the 3 components of the exposure triangle that is lens dependent.
The better the quality of the lens, the better the aperture, and the better the quality potential of your photos!
Yes, ladies and gentlemen! It is utterly possible to get by with a great lens AND not-so-great camera body.
And of course, aperture is also key in creating a shallow depth of field.

We’ll get into the specs on that too.
Patience people. ‘Tis a virtue.
Moving on.
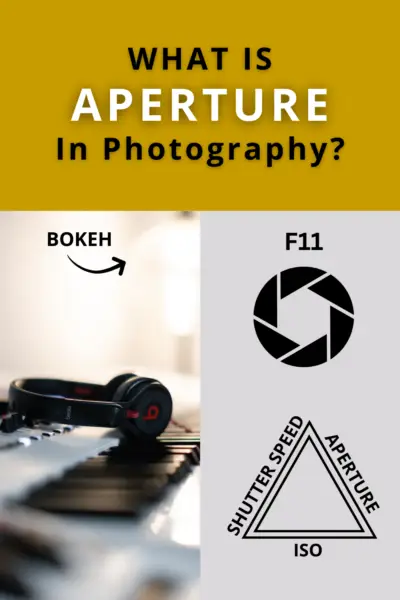
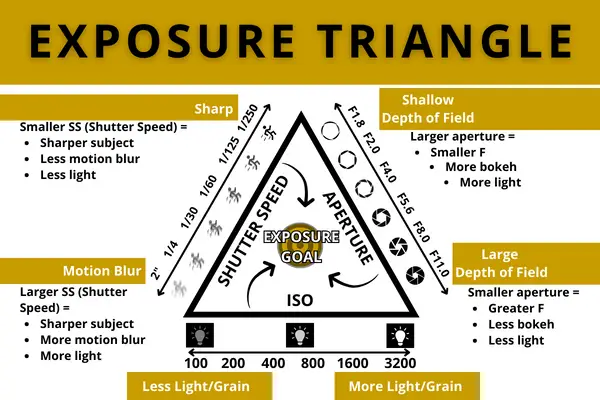
#3 The Exposure Triangle
What is the exposure triangle and why is it so important to know?
Why, I’m glad you asked that question.
The exposure triangle is a concept that explains 3 components of a camera and lens that work together to affect the exposure of an image.
Exposure refers to how well your image can literally be seen. In other words, how well your image is lit or exposed.
The best exposure of an image should be your goal as a photographer. Correct exposure affects the quality of your image in the post-editing process, the final results of that image and the viewer’s ability to appreciate those final image details.
The proper exposure can make the image.
**PRO TIP: It’s important to understand the exposure triangle because once you understand how each of the 3 components work separate from and with each other, then you will be able to nail the proper exposure every time and in any situation.
It also gives you a level of creative control that would not be achieved otherwise.
And this, my friends, is what separates great photographers from your average photographers.
Aaaaaand, this is also why you must understand how aperture works!
Since aperture is 1/3 of the exposure triangle, you must know that the other two components are shutter speed and ISO.
We will get into those in future blogs.
#4 How does aperture work?
“Ok, I’m convinced. Explain to me how aperture works then,” you’re thinking right about now.
Well, if you’ve read everything up until this point.
At least, that’s my hope.
If so, then let’s do dissssss.
Remember from the first principle that aperture is the opening in a lens that light passes through.
The bigger the aperture, the bigger the amount of light that passes through a lens.
The smaller the aperture, the smaller the amount of light that passes through a lens.
And the bigger or wider the aperture (or vice versa), the bigger (or smaller) the amount of light that can pass through and hit the camera’s sensor to better expose the image.
You also need to remember that aperture affects depth of field of an image. Because there is a lot of explaining to do with this concept, we’re saving this for the 5th and final topic of discussion in this blog. You can hop down to read on it now if you’d like, but I’d recommend just reading through this blog from top to bottom for the best understanding. So just table this thought for now.
Back to the subject at hand…
Your goal, as the photographer, is to be able to change how much light passes through your lens to provide the proper exposure for your images.
To do this, understand that every camera lens has an aperture range.
To find this on a camera lens, you need to know what symbols or terms represent aperture.
Aperture Terms & Lingo
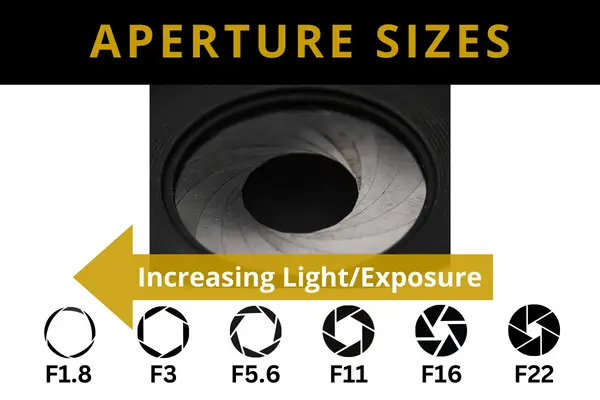
Aperture is represented by the symbol f.
You may also see this as mm f or f followed by a / (forward slash) and then a number.
For example, f/2.0.
The photography term for aperture or f is called an f-stop value.
The bigger the f-stop then the bigger the opening is in a camera lens to allow a bigger amount of light to pass through to the image sensor.
And, remember the reverse is true.
I.e. the smaller the f-stop, then the smaller the opening is in a camera lens which means less light passes through to the camera’s sensor.
So, an f/2.0 is bigger aperture than f/11.0.
“Wait, whaaaa?” Ok, lemme help you understand.
To really grasp this, think of the f-stop value as a fraction. Yes, we’re talking mathematics people.
But, relax!
Not anything complicated.
For example, we all know that ½ is the same as 0.5. In other words, 1/5 (one fifth) is 0.2.
Think of money.
Out of 100 pennies, ½ is 50 pennies. Out of 100 pennies, 1/5 is 20 pennies. Per the old school textbook, “Now Johnny, which one is greater, ½ or 1/5?”
Well, if you break it down like we just did, that answer is easy. ½ is greater than 1/5! I mean, I’ll take 50 pennies over 20 pennies any day!
Similarly, in this example, an aperture of f/2 is a wider aperture than f/5.
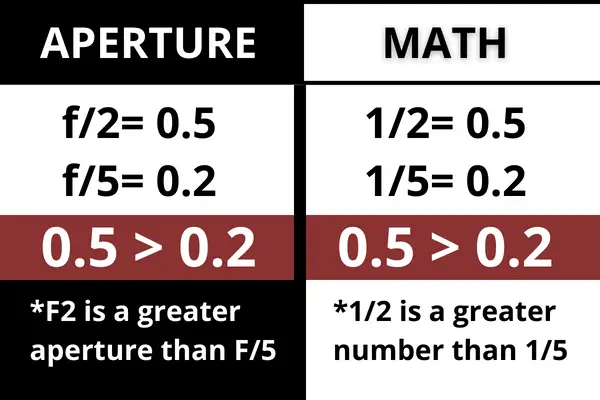
Another way to think about it is the bigger the f-stop value, the bigger the aperture.
Hold on, don’t get confused now. Read the next sentence.
In other words, the bigger the number is on the bottom (denominator) of the aperture fraction, the smaller the aperture is. This represents a smaller opening in the lens.
If needed, just review the previous graphics remind yourself of this.
You have to understand that there is a difference in understanding the f-stop values versus the language used to define them.
For example, in photo-lingo, certain terms are used to describe the size of the aperture.
A wide aperture or large aperture indicates an f-stop value with a small number at the bottom of the fraction or next to the f.
For example, the Canon 50mm prime lens with a maximum aperture of f/1.2 is a highly coveted lens because the aperture size can extend past a prime lens of f/1.8.

When it comes to the aperture of a camera lens, the higher f-number indicates the largest aperture which means the better that particular mm lens will do in low light settings or dark environments (and give you greater depth of field). Why? Because the bigger the opening in the lens, the more available light that can pass through.
What you need to understand is that different camera lenses have different maximum apertures and thus different f-stop scales.
Differences in Aperture
Let’s discuss the differences in aperture value.
Different camera lenses will have different aperture ranges. While the definition of aperture is the same from brand to brand, it changes depending on the scale of that lens and the focal length of the lens.
For example, from Canon to Nikon, Tamron to Sigma, the aperture for these lenses are all represented by the f-stop value.
However, camera lenses can have different f-stops even if they’re the same brand.
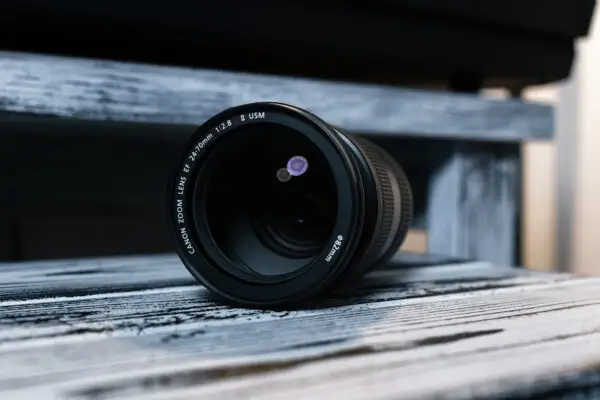
Let’s break this down into two categories of lenses… prime lenses versus zoom lenses.
Prime Lenses are camera lenses with a fixed focal length. In other words, it is a lens that does not zoom. I know, kinda like, “duh.” But still. It needed to be said.
Whereas zoom lenses can change their focal length.
Two of my favorites are the Canon 50mm prime and 24-70mm zoom lens.
A focal length of a lens is the measurement of the distance from the very center of that lens to the focal plane (also known as the imaging point), which is where the light of the image is collected!
This is why you will see lenses defined as a ##mm lens. For example, 70mm vs. 35mm.
If there is only ONE number then that is a prime lens and it has a fixed focal length.
If it is two numbers separated by a dash, such as ## – ##mm, then that is a zoom lens where the focal length can be adjusted to zoom in or zoom out.
Aperture correlates with the focal length of a lens by being the numerator of the f/##.
You simply plug in the focal length of your lens and divide it by the bottom number (denominator) of the aperture fraction, and boom! It gives you the numerical value of the lens opening for that particular f-stop setting.
For example, let’s say you have your aperture set at f /2.0 in a prime lens of 85mm.
85/2 = 42.5mm.
42.5mm is the size of the 85mm lens opening.
Now let’s say you have the same aperture of f /2.0 but in a prime lens of 50mm.
50/2 = 25mm.
25mm is the size of the 50mm lens opening.
For a zoom lens, there is a range of focal lengths available for you to use for your lens. Unlike the fixed focal length in a prime lens.
The opportunity for different settings of the focal lengths provides you with variable aperture settings.
Meaning, the size of the lens opening will very within one lens even though your aperture can be set.
For example, in the popular Canon 70-200mm zoom lens (amazon link) with an aperture set at f/2.0:
- At 70mm, the lens opening size will be 70/2.0 which equals 35mm.
- At 200mm, the lens opening size at the same aperture will be 200/2.0 which equals 100mm!
Does that make sense?!!
Because of this, you might also hear zoom lenses be referred to as variable aperture lenses.
Now let’s talk about the advantages of one vs. the other briefly.
Prime vs. Zoom Lens
Prime lenses are cherished because they are known to have a wide maximum aperture.
This means that in comparison to a zoom lens, even a high-quality zoom lens, the widest aperture of the prime lens will typically always be greater than that of the zoom lens. This is why they are also called a fast lens in photography lingo.
The wider aperture of the prime lens means it has a wide opening which means multiple things:
- It does well in in poor lighting conditions
- Greater ability bokeh
- Greater ability for unique creativity of shots
A zoom lens on the other hand, provides the flexibility to change your focal length within one lens as opposed to switching lenses for a different desired focal length in a prime lens.
But as a result, you are giving up a higher f-number and thus ability for greater bokeh (i.e. blurry background) and quality of your images in a low light setting.
Different Aperture Modes in Camera
Now before we get to the definition of the word aperture in the sense of depth of field, let’s discuss the different ways to control aperture in camera.
Now, when you look at your camera’s menu, you will see different settings for your camera.
In this blog, we will focus on those geared towards your lens aperture.
Basically, you can choose between auto mode or aperture priority mode.
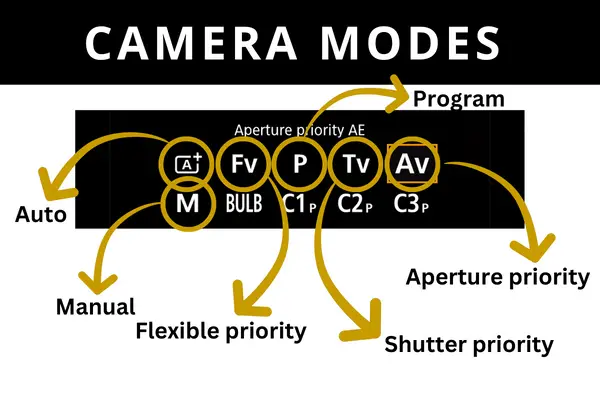
Auto mode is usually indicated by the word “Auto” on Canon cameras.
Automatic Mode
Automatic mode means the camera automatically sets your controls for the best exposure it believes best for your current image.
Essentially, all you do is point and shoot. The camera brain adjusts the aperture, shutter speed and ISO settings for the best exposure of your image.
The problem is sometimes, it does a good job BUT for a different reason than what you need it to do and not considering what lighting conditions you can fix in post, when you’re editing the photo.
Listen.
The best person to give you the best feel of your images is YOU. Not some think-less, computerized camera brain.
And yes, I know “think-less” is not a word. But it is now.
You’re welcome.
With that being said, I do NOT ever recommend auto mode.
You can easily learn how to do adjust your settings manually and with time, it’ll become second nature. This will give you complete creative control of your images no matter the setting or conditions you’re shooting in.
Auto means Automatic Mode
You can find the automatic mode on your camera by turning your menu dial to AUTO. This is usually the symbol indicated for Canon and Nikon brand cameras.
It may be different on other brands, but you can usually figure this out by turning your dial to that option and seeing what the LCD screen says when it’s selected and/or look at the menu options and its symbols within the camera.
“Av” means Aperture Priority Mode
Aperture mode is found on your camera dial usually by a capital “Av.” This is how it’s symbolized for Canon, and Nikon cameras.
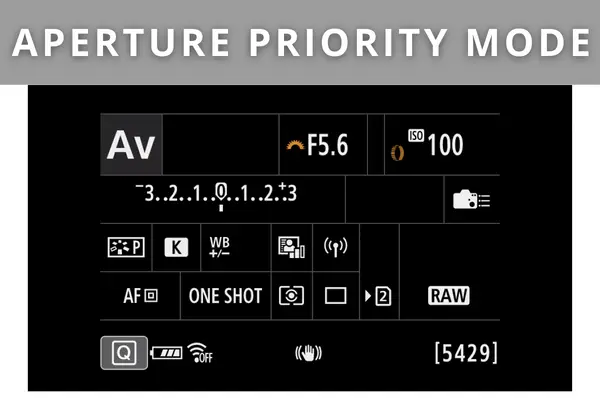
It might be different on other camera brands but you can find that out by turning your menu dial or digital setting to that mode and seeing what it says in the LCD screen or menu options.
Aperture priority mode is a semi-automatic mode. Meaning, the camera shares some responsibility of helping set the other two components of the exposure triangle to give you some manual control.
There is Tv or S which indicates Shutter Priority mode, which is a similar semi-automatic shooting mode but for shutter speed. We will not get into that in this article but will in the next up-coming one, so stay tuned!
I.e. sign up for my newsletter to get the breakdown when that blog post comes out!
Anywho, aperture priority mode allows you to have manual control of the aperture stop setting. BUT while you have free reign of setting your desired f-stop, the camera will then adjust the other exposure settings of shutter speed and ISO to help create the ideal exposure for your image.
It’s an easy way to introduce yourself to manual settings if you’ve been used to working with the automatic mode.
Now there are other modes we could get into, like Program mode, but honestly, my focus is to delve into the basics and anything surrounding those that are important to eventually guide you to manual mode.
So because discussion of these do not fit the goals my blog article, I’ll direct you to Expert Photography’s article which does a great job of delving into these concepts to give you a well-rounded background should you desire to learn more.
For now, let’s move onto a brief discussion of manual mode.
Manual Mode
Ahhhh, now this mode, my friends, is THE mode to get comfortable with.
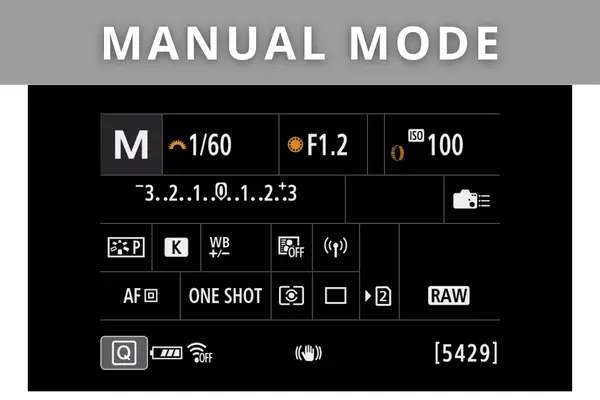
I just don’t believe there is a greater mode than manual to start with.
Manual mode gives you complete control of the exposure triangle which means you have complete control over the exposure of the image.
While I would love to go in-depth in how manual mode works, it won’t do you much good if you don’t know how the other fundamental camera settings work.
For now, let me generalizes some key points when working manual mode.
In manual mode, you’re able to control how wide or narrow, i.e. how big or small the aperture is. Now, if you’re adjusting aperture by setting it at a low number to give smaller depth of field or to let less light in, or a higher number to give a greater depth of field or to let a lot of light in, then you’re likely going to have to adjust one or both of the other settings.
Sometimes in trying to achieve a certain exposure versus bokeh, the adjustment in aperture has to be offset by adjusting the shutter speed and/or the ISO.
For now, just know that wherever you are at in your stage as a photographer, manual mode should be the mode you aspire to get comfortable with.
If your start in photography is in one of the other modes that gives you some manual control, works towards full manual control.
This will allow you the most opportunity to create unique shots that you cannot achieve otherwise.
#5 Aperture and Depth of Field
Finally, let’s talk about aperture and its effect on depth of field.
This is the fun aspect of aperture, my friends!
First, we must define the phrase “depth of field,” in order to understand it fully when we start applying our knowledge to the camera settings.
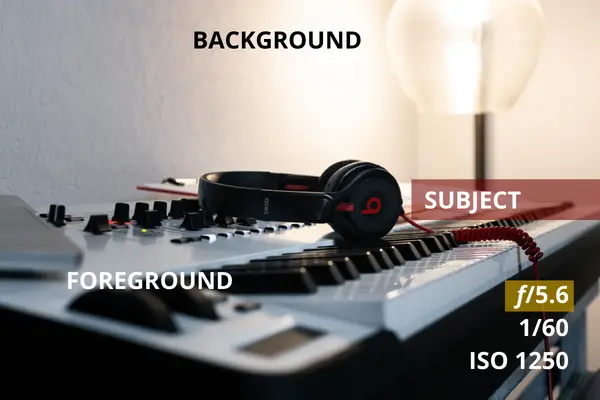
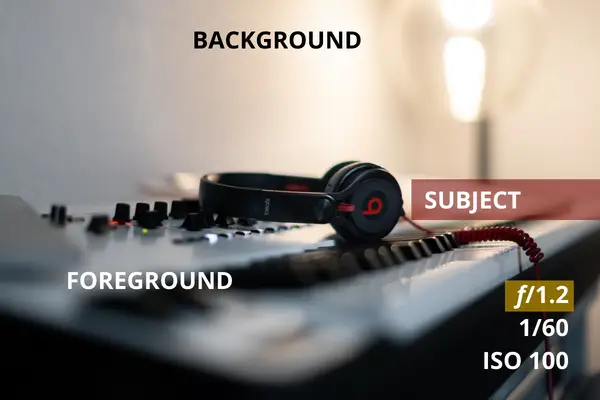
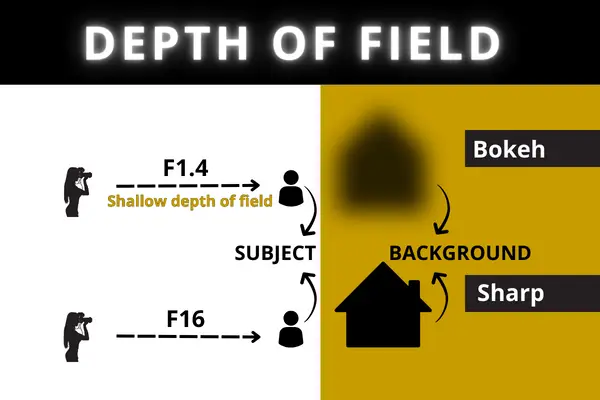
Depth of field is how much of your scene is in focus vs. out of focus or blurred.
A shallow depth of field means that a very small portion of your image is in sharp focus and a large part is blurred. In other words, your subject will be in focus but the background and foreground will be blurred or out of focus. In particular, the background blur is what professional photographers call bokeh.
Bokeh being pronounce “bow-kah.”
Deep depth of field (bokeh)
Shallow depth of field (bokeh)
A deep depth of field means a large portion if not the entire scene is in focus with a very small part blurred, if any. With this type of setting, the foreground, subject and background are all in focus.
The shallow depth of field with emphasis on a subject combined with a blurry background is popularly used in portrait or macro photography whereas the deep depth of field technique is more for landscape photographers.
“Okaaaaaaay?” You’re probably thinking.
“So… what? What does this have to do with aperture?”
I’m glad you thought that question.
You see, aperture is that aspect of the exposure triangle that directly affects the depth of field.
The larger your aperture, the more shallow your depth of field which means the bokeh in the scene is greater.
The smaller the aperture, the bigger the depth of field which means bokeh is reduced bringing all elements of your image into focus.
We can say this in so many ways for you to grasp this concept. It’s all a matter of what works for you.
For example…
Larger apertures means more bokeh, means more of your subject is in focus.
A smaller aperture means less bokeh, means more of subject and entire scene is in focus.
Remember, the bigger the fraction (i.e. the smaller the number is on the bottom/denominator), the greater the blurred background because the depth of field is shallow.
The smaller the fraction (i.e. the bigger the number is on the bottom/denominator), the smaller the blurred background because the depth of field is deep.
My suggestion to get this ingrained in your head is to practice on your camera.
Turn your camera setting to manual, and then go outside and focus on a main subject with a clear background, like a potted plant in front of window.
Adjust your aperture settings to change the f-stop and see in real time how it affects your bokeh by affecting the depth of field of the scene.
Couple of points to keep in mind is that sometimes you’ll hear photographers or specs for lenses talk about aperture blades. Yes, this is a thing. And it’s simply referring to the adjustable opening of your camera lens that allows light to pass through.
Everyone always references this to the pupil of the eye, which is very true. In dark settings, your pupil gets bigger to try to allow more light in so you can see better. In bright lit environments like when the doctor shines a light in your eye, your pupil gets smaller to decrease the amount of light that comes in.
Well, the blades help the shape of the light passing through and thus the reflection of the shapes of bokeh in your background to appear more circular.
You see, the more blades for the aperture in a camera lens means the more circular the opening for light will be which, for some photographers is important.
It’s totally your call, but 9 blades is the usual ideal minimum go-to for professional photographers.
To Recap:
Understanding Aperture
We’re discussed the various aspects of aperture in layman’s terms in hopes that you’ll be able to easily understand that vital concept in photography.
Let’s quickly rehash those concepts.
So again, for the last time, what is aperture? Or in today’s lingo, “What it is yo’, whassup?” Baha. Jk.
ANS: It’s an opening through which light passes through.
Why is it important?
ANS: It is 1/3 of the exposure triangle giving you control with the exposure of an image and affects depth of field.
What’s the exposure triangle?
ANS: The exposure triangle is made of 3 parts – aperture, shutter speed and ISO. Knowing how to control these 3 elements will allow you to control how “well lit” or exposed your image is.
How does aperture work and how is depth of field related?
It works by making the lens opening where light comes through, bigger or smaller.
The bigger it is, the greater the light that comes through and the more shallow the depth of field is to give that creamy bokeh out-of-focus background effect. This is key in portrait photography.
The smaller the opening is allowing only a little light to come through, and the lower the camera aperture, which means a lower f stop, which also creates a deeper the depth of field, removing that bokeh affect to bring the more if not all of the scene into focus. This is key in landscape and architecture photography.
And that my friends, is the skinny on aperture.
I’ve already referred to it but you can read another perspective on aperture in one of my favorite articles.
Remember, the more you know about these basic concepts in photography, the better the photographer you will be. These are foundational concepts that I believe you should master at the beginning of your photography endeavors and if not, then it’s never too late to pause and take time to learn them.
I’m interested to see if this helped you at all! If so, drop a comment below and share your feedback.
Otherwise, stay tuned for the next upcoming blogs on the fundamental concepts of photography focusing on shutter speed and ISO.
