
For the photographers who are just getting started into the wonderful world of photography, this blog post is for you.
Personally, I am a visual learner and found that watching a video tutorial was very helpful when it came to a quick tutorial on the features of Lightroom. But because I had to watch either the same video again or other similar lightroom classic tutorials repeatedly to remember everything when I took the next step into applying what I learned, I’m writing this blog to help minimize that need for repetition.
For the sake of simplicity, we will focus on the basics of lightroom in this
Adobe Lightroom Classic tutorial.
This post may contain affiliate links, which means I’ll receive a commission if you purchase through my links, at no extra cost to you. Please read full disclosure for more information.
What is Lightroom?
First, let’s address what Lightroom is exactly.
Lightroom is a software for editing photos that many professional photographers consider to be the standard when it comes to photography editing.
The Different Types of Adobe Lightroom
To be clear, there are different versions of the Lightroom software. I discuss this in another blog that you can read here.
They are owned by Adobe which has a creative cloud suite option that allows you to receive access to all of their editing software beyond photography.
For the sake of this discussion, our focus is on Adobe Lightroom Classic, which is also known as Lightroom Classic CC as opposed to the Lightroom CC version.
Adobe Lightroom Classic is the more accepted and widely used version by professional photographers. It is a desktop-based application whereas the Lightroom CC version (Lr) is the cloud-based to allow syncing across multiple devices including desktop, mobile and the web.
I love this version of Lightroom even though it may not be the most easily accessible when traveling or if you’re on the go a lot. For the reasons of reliability, control and access to Adobe’s comprehensive editing tools, this version can’t be beat.
Organizing Files
The best way to get started with Lightroom is to start the storing and importing process the correct way.
I wish I had known this when I first started out because it would have saved me a lot of heartache later on.
What I mean by storing is getting an external hard drive specifically for your photography business. Whether you’re in the beginner stages or not.
Saving to an external hard drive will allow you to save space on your desktop or laptop computer and not run into the risk of running out of space to work.
Several affordable external drives are the WD My Passport, Seagate Portable Hard Drive, LaCie Rugged Mini External Hard Drive and the SanDisk Portable SSD.
I have used the WD My Passport without any issues. At least 2 terabytes or 4 would be a good start.
I no longer use the Passport due to the volume of work I am blessed to now have. Currently, I’m using the LaCie 2big Dock RAID 16TB and find it to be absolutely amazing. I’ll do a review on that in a future blog post.
My suggestion is to create a system for organizing your photography work. This will optimize your work flow for the future.
Briefly, my suggestion is to group your work by years. Within that year, say, year 2022, create a new folder for whatever new work you’re going to import.
For example, I just did some blue hour shots in my local home of SA-town. On my external hard drive, within an already present 2022 folder, I create a new folder labeled by the year – month – date and brief description of the shoot.
Within this new dated folder, I create another folder that is labeled “Footage.” Sometimes I will add further folders by specifying if it’s photo or video raw footage. Once I do this, I download the raw files off the memory card into the appropriate folders.
You can see how I organize my files in this video here.
Once this is done, it’s time to access Lightroom.
Basics of Lightroom
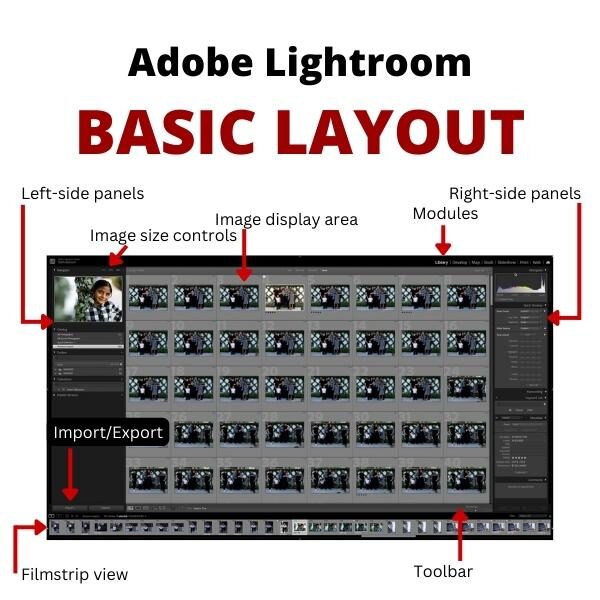
If this is your first time working with Lightroom, it’s best to have a general idea of the layout of the software. Upon first glance this is what each area is called and where it is located.
You can also read my blog on the different methods to select photos to get a deeper description of the basic layout of Lightroom.
In short, you will be working in one of the different modules any time you’re in Lightroom. Located at the top righthand side in tab-like format, each module is as follows:
- Library
- Develop
- Map
- Book
- Slideshow
- Web
Primarily, you’ll be working in the Develop module the majority of the time and then likely the Library module. The more advanced you become, you can explore other advanced techniques to utilize in the other modules.
Importing Photos
Now that you’re familiar with the basic panel layout of Lightroom, you need to import your images. To do this, first open Lightroom to create a new catalog. The Lightroom catalogs are where your imported images are stored, editing techniques applied and then saved for future use.
Again, numerous professional photographers will tell you that having a system for creating and organizing your catalogs is the foundation to a professional workflow. Many have their own personal way of doing this and viewing their tips on Google or YouTube can help you create your own method.
An easy way to do this is to select the create a New Catalog when prompted at first opening the software, or going to the top left toolbar and selecting File and then New Catalog.
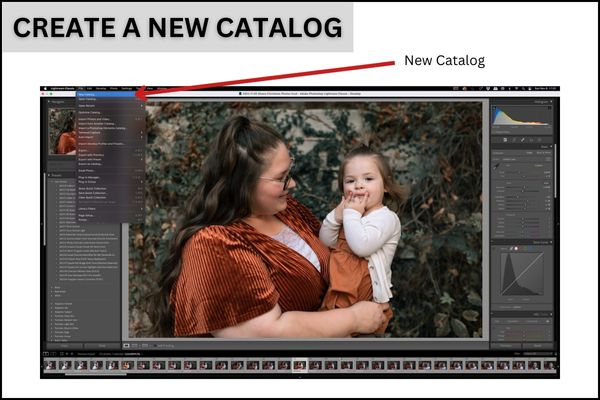
Within the Create Folder with New Catalog dialog box that opens, you can easily choose where you will want to save this new catalog and what to name it.
Personally, my method is to save a new catalog within the same project folder where the RAW files I plan to import into this new catalog, are stored.
Once that new catalog is created, then make sure you’re in the Library module first, and click the Import button at the bottom left corner.
Again, if you watch this video (included above as well), I go into all of this here.
From there you’ll use the Sources on the left side panels to select what raw image files you want to import into this catalog.
You’ll see at the top of the screen that you have options of making copies of the raw format when you import these images in.
*Quick tip: importing a copy of your raw images can be extremely helpful if you’re creating a new Lightroom catalog immediately after connecting your memory card as opposed to creating a new folder and then copying the raw images first to your hard drive and then importing those images from your hard drive into Lightroom.
What happens is the original file is kept on your memory card and a copy of that raw file is imported into Lightroom.
HOWEVER, make sure to specify the Destination of these copied raw images! Beginners may not be aware of this step and end up storing these images directly on their computer. This eats up storage quickly and before you know it, you’re out of room and wondering how that happened.
Specify the destination (preferably an external hard drive) and then click Import at the bottom right and boom. You’re ready to start editing!
If you read that and was like, errrr what?! Check out this simple tutorial that explains it nicely.
Either way, always save your original image files for back up, to use in the future or to have something to compare to later on down the line.
Editing Photos
After you have created your new catalog and imported your raw images, then you can start editing.
Yes, my friends, this is probably what you’ve been waiting for. I agree, I think it’s the best part of about this whole process too.
Let’s talk about the editing you can do in the Library and Develop modules.
Library module
Within the Library module, your default setting is grid view. Within this grid view you can perform basic edits to your original image files.
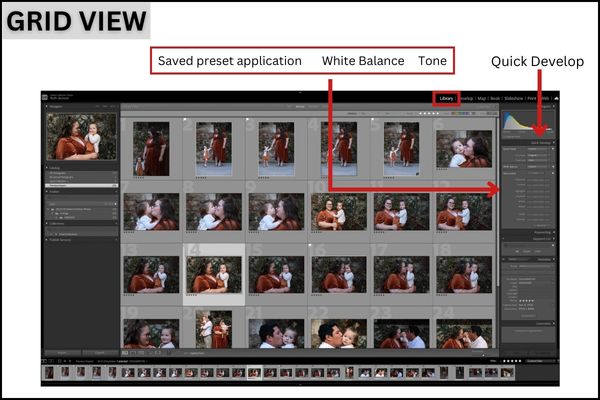
This can be very helpful if you have groups of photos taken with similar white balance, lighting and environments.
Lots of times professional photographers will “batch edit” meaning they will edit a group of photos simultaneously which is a great way to save time.
Within the Library module, you can do this by selecting a group of photos, and with the tools in the panel on the right side, apply basic adjustments.
You can do white balance correction, correct exposure, whites and darks, shadows and highlights.
The beauty about doing these basic adjustments here is that you can see the changes to these photos all at once within the grid view.
However, the next level of editing takes place in the Develop module.
Develop module
The Develop module is where magic happens. This is THE module for editing.
This is where you have full access to Lightroom’s most powerful features.
Let’s review these tools in the right-sided panels from the top down.
*Keep in mind that Adobe updates their software frequently and the newest version may have additional tools added or different variations of those tools.
Within this 2022 version of Lightroom, the first and foremost panel is the Histogram.
The Histogram allows you to see the spectrum of your colors within your active image photo, which is the single image displayed in the image display view.
Underneath is a row of tools from first to last labeled Edit, Crop, Healing, Red Eye Correction and Mask.

Let’s briefly discuss a few of these most-used features.
The Edit section is where you can do your basic corrections to white balance, exposure, the highlights and shadows, and whites and blacks. Included in this panel are the texture, clarity and dehaze controls.
The Healing tool is fantastic.
When this blog was being completed, they updated Lightroom and added a content-aware feature to this tool. It is AH-MAZING. It works differently than spot-healing or cloning, by filling in whatever space you select with AI detected content to match as best as possible.
Is it perfect? No, but when used the right way, saves you a lot of time with removing blemishes or other spots that need to be cleaned up.
Then there is the mask. The mask is LIFE.
Within this mask you can choose different types of masks. Now the software gives you the ability to select the sky or just the subjects. It’s insanity to see, use and experience.
But the adjustment brush deserves some attention here.
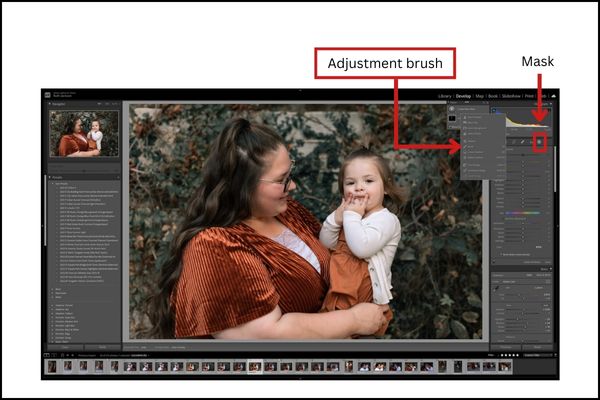
The adjustment brush allows you to perform local edits to your image in a way no other mask can. It is literally a paintbrush but in circular, digital form.
You can literally use this brush to paint a mask on specific areas of your image and when you adjust your white balance, exposure, highlights, shadows, and everything under its features, it only applies those settings to where you applied your brush.
You can also change the size and feather of the brush, besides it’s other modifiable features.
It is an amazing tool that you should take the time to delve further into learning with other useful lightroom tutorials.
But let’s move on before we get bogged down here.
Below the Basic panel is the Tone Curve. This section is comprised of 3 curves also known as the RGB (Red, Green, and Blue) curves which allows you more control on the color tones of your image.
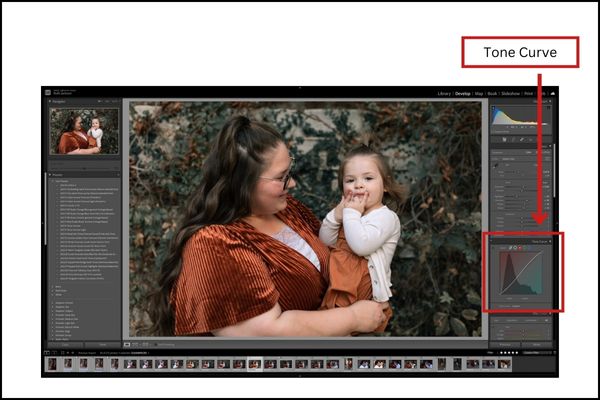
The Digital Photography School has a helpful tutorial on this very subject that you could delve further into.
Below this resides the HSL/Color panel.
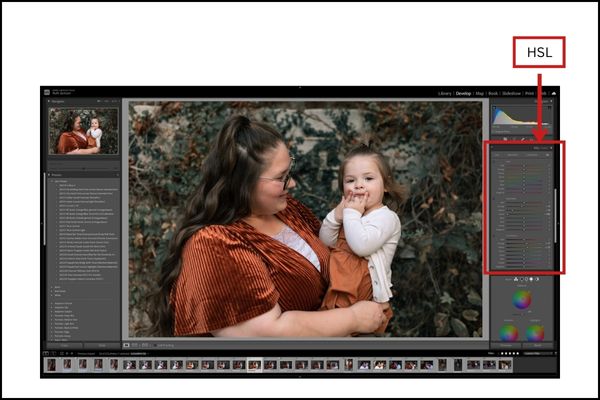
Here you have greater control over the quality, depth and brightness of specific colors in your images. For example, I do not like yellow in most of my images so I usually will bring this down in the saturation and luminance controls.
Color Grading follows next and I love this section. You can give your entire image a certain look by giving a slight edge of dominance to the colors in just the midtones, highlights and shadows.

Underneath this is the Detail panel.
Here it has useful features for adjusting the sharpness and noise reduction of your image. I find that using this in photos taken in low light settings has been extremely beneficial to reducing the noise in my images despite the actual circumstances of when those images were taken.
Next follows the Lens Corrections panel where you should always adjust to remove Chromatic Aberration and Enable Profile Corrections, in my opinion.
This gives more information to your images on what make, model and profile of your camera was used. This is fantastic for future reference for various reasons that we won’t get into at this moment.
Following these are the Transform, Effects, and Calibration panels.

Professional photographers are HUGE proponents of making your photos symmetric and straight. Consider your composition at all times, and using the Transform panel will help you correct this in post.
In Effects, you can add vignetting and grain to your image. Vignetting can help add focus to your image, bringing the eyes directly to the subject. And some like to add grain to give their photos a vintage or old-school type of look.
Personally, I’m not a huge fan of grain… yet. I’m sure there’s purpose I could find as I continue to grow as a photographer though.
I love the Calibration panel.
Here you can add a certain look and pop to subject’s skin tones in particularly. Giving it an almost golden appearance that is so slight but so effective.
We will get into the value of detailed tutorials a little further down, but just remember this is a brief overview of the tools in these panels.
Exporting Photos
When you have completed editing and are happy with your final image, you’ll need to export it.
When you export your final photos, these will be jpeg files.
Important features to keep in mind with the export box is to make sure you export these images to the folder where you have the contents of the same project originally saved.
This keeps all the same contents (RAW footage, Lightroom catalog) together and organized for future reference.
Under File Naming, check the Rename To with your brand or company initials or some other identifying factor so that each of your images has your label attached to its unique original file number.
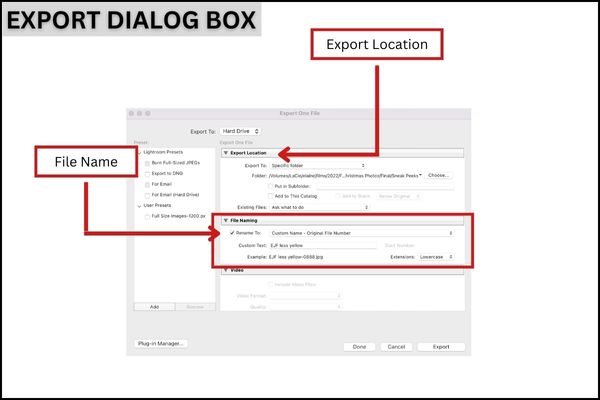
Other photographers may suggest otherwise, but this is the method that I use.
And as I tweak certain images, then I will include additional text in the Custom Text box, following my initials of my business.
You can see an example below of this. My brand is Elaine J. Films and for short, I use the abbreviation “EJF.” This is added to every photo I export and then the default Lightroom File Number besides it.
Then under Image Sizing, I will make sure the resolution is 300 pixels per inch for maximum print resolution or change it to 72 and check the resize to fit option and limit the size for online viewing purposes.
It’s important to reduce the quality of your high quality images for optimal viewing online and loading purposes for websites.
Great Resources for Beginner Tutorials
Whew.
I know that’s been a LOT of information but trust me.
This will help you get familiar with most of the features of Lightroom so you can start using its amazing features.
My suggestion is to educate yourself further with other online education resources. Posts by Digital Photography School, YouTube videos by Peter McKinnon and other professional photographers can give you really awesome tips to both read and see in action.
Personally, I took the Photo Pro online course by Full Time Filmmaker and found it to be a great introduction to photography. They had a few videos on Lightroom that gave me everything I needed to get started.
It gave me the tools to get started, but it wasn’t until I started applying what I learned from that course that things began to grow for me.
From there I was able to know what to search for online for further information, coming across other blog posts and YouTube videos showing me how to work Lightroom effectively to enhance my importing, editing, and exporting work flow.
Pro Tips
My suggestion is to do exactly that.
If it worked for me to learn photography within a few weeks, enough to get started anyway, then I know you can do it too.
#1.Watch others’ methods for using Lightroom features through online tutorials. I have found that video tutorials are the most helpful for this.
#2. Search for professional photographers on social media whose style you love and want to emulate, and see if they have any tips or advice regarding Lightroom.
#3. Enroll in an online course specifically on Lightroom or has Lightroom tutorials included.
#4. Download my Lightroom Cheat Sheet. This will contain the images from this blog for quick reference.
#5. And most importantly, take what you learn and apply it within the software.
The goal of this blog post was to provide
a brief comprehensive guide to beginners in photography
as a stepping stone to an actual Lightroom course.
An important step in progressing in your editing skills is educating yourself and practicing what you’ve learned.
This brief overview is a starting point along the path to a detailed tutorial will be key in advancing your skills.
So don’t stop here. Check out the other great resources I mentioned, enroll in an online course, and even stay connected with me through my newsletter. I’m working on a photography course that I plan to launch at the end of 2023. And yes, Lightroom tutorials will be included.
“Goodness, that’s a year out!” you might be thinking, but I’m a perfectionist and want to make sure anything I put out there is going to equip you as a photographer and not just entertain you.
Til’ then, keep learning and growing. And as a professional photographer, Lightroom is one of the best resources to do so.

Thanks for this blog. I’m an 80 year old hobbyist, totally new to LR Classic but not to photo editing having used other programmes for some years.
Its all a bit daunting as you can imagine but I’m checking out lots of online resources so hopefully I’ll get it sorted!
I’ve signed up for your newsletter.
Thanks again.
David Herts., UK.
David, thank you for your feedback and subscribing. Kudos to you doing your research! My plan is to provide more of these throughout the next year. We’re working on trying to get better graphics to help “see” things a little better. We’ll keep you posted on that through the newsletter. Regardless, I’m sure you’ll get the hang of it! There’s a lot of helpful info out there. I’ll look forward to hearing about your progress!
Hi