
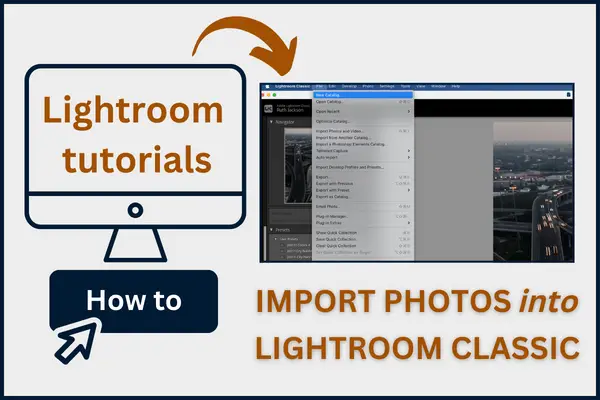
Ways to Import Photos into Adobe Lightroom
If you’re at the beginning stages of becoming a professional photographer, I am certain you will DEFINITELY benefit from this blog post.
Adobe Lightroom is the standard in photography editing software. Yes, there are other photo editing softwares out there, but because of its widespread popularity and reputation, chances are you will eventually need to work with Lightroom.
In my opinion, this is the best software to work with, especially starting out. For the reasons we just discussed and those we have not discussed which you can read here (*Lightroom Classic Tutorials for Beginners), but also because it’s a relatively inexpensive monthly subscription at $10 a month (at least, that is the cost at the time this is being written).
In short, knowing the proper way to import photos into this software is a vital foundational step in your photography career. Knowing how to do this the correct way from the start will save you a lot of heartache and give you a jumpstart in organizing your business efficiently as it develops and grows.
Summary Preview
In this blog post, we’ll discuss what hardware to invest in before importing photos, how to import photos and organize your footage simultaneously, and other miscellaneous but important tips to importing images.
This post may contain affiliate links, which means I’ll receive a commission if you purchase through my links, at no extra cost to you. Please read full disclosure for more information.
First things first, Lightroom versus Lightroom Classic
This is old hat to my articles, if you’re at all familiar with my previous Lightroom Tutorial series of posts. Just to be clear that moving forward in this post, any time I mention Lightroom, I am specifically talking about Lightroom Classic.
There are different versions of Lightroom available. They boil down to mainly two, being that which is accessible and stores via cloud access and that being the desktop version. The former is simply called “Lightroom” and the latter as “Lightroom Classic.”
Lightroom is the newer version that is cloud-based versus Lightroom Classic which is desk-top based. You can access both on mobile device but do note that certain tools and features are limited on mobile versus full access on desktop or even the cloud-based version. You can read more about these versions in this blog post.
Lightroom Classic CC and Lightroom CC Classic are referring to the same software. The real difference is between Lightroom Classic versus just Lightroom CC (without the “classic). Lightroom Classic is again, the desktop-based version that gives its user full access to all its tools and features.
In short, the CC stands for “Creative Cloud.”
The history behind all the various versions of the names is confusing but interesting. If you would like to read more about it, you can read an article by Phototraces here.
Only two versions are available at this time, that being Lightroom Classic versus Lightroom. But Lightroom is available on desktop, mobile or the web.
Personally, I believe the desktop-based version is the best version to use so I’m not missing out on any tools or features that might not be accessible on the other versions. I strictly edit on LrC (Lightroom Classic) from my desktop, and hence refer to this version of Lightroom in all of my blog articles.
At some point in time, I might try other versions of Lightroom but until I do, please note my shortening of the Lightroom Classic name to “Lightroom” in this post is indeed referring to Lightroom Classic, unless otherwise specified.
Hardware Tips
Before we get into the steps of the import process, let’s discuss your potential storage device.
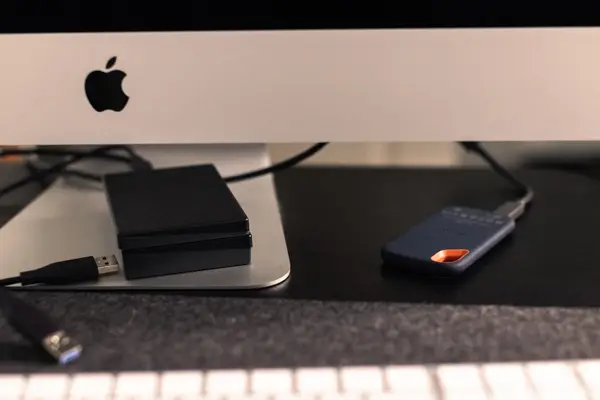
It is imperative to understand that you need to have another option for storage besides your computer’s hard drive.
For most photographers starting out, this is likely something you are not aware of. BUT your computer’s hard drive is likely inadequate to store everything you’ll be saving, need to save and work on when it comes to photography.
Photography software, images and edits to those images use up a lot of space. Within just a few photoshoots, you’ll likely be at capacity on your computer’s hard drive and by then, you’re behind in your work flow in trying to figure out how to free up storage without losing anything. Not to mention, researching alternatives to move your storage to another hard drive while still having readily access to it at the same time.
Start your photography business on the right foot by investing in external hardware from the start.
I’ve personally used WD Passports from 2 to 4 TB (terabytes) to a LaCie RAID 16 TB hard drive. Starting out, it’s likely best to invest in something that can do the job but yet is budget-friendly at the same time.
We can get into a further discussion of those options in another post, but my suggestion is to consider the WD Passports, SanDisk Extreme PRO Portable SSD, or the LaCie Rugged RAID external hard drives. The investment could cost you a few hundred bucks but compared to over $1000, is definitely affordable.
Trust me. Doing this will save you a lot of time and heartache in the future.
My top choice is the SanDisk Extreme Pro SSD external hard drives. They are durable (can take a fall like if you accidentally drop it), small and easily transportable. They are also hugely reliable.

But whatever choice you end up investing in, use it to store your footage and edits. Again, this will keep space free on your computer, and allow you to continue saving, storing and using your footage from computer to computer.
The Import Process
Ok, now we’re ready to get into the meat of this blog and that’s the import process itself.
Before going any further, do note that I’m jumping right into the features of Lightroom from the perspective that you, dear reader, already have a basic understanding of the layout of Lightroom.
If you need a general introduction to Lightroom, then I suggest you read this article on the basic of Lightroom first.
This first approach is from the perspective of importing photos from an external hard drive. Personally, this is the import method approach I usually take.
Importing from an external hard drive
After I complete a shoot, my priority is always to get the images off my memory card and onto an external hard drive asap.
If I’m on a commute from somewhere, I transfer these from the memory card to my SanDisk Extreme Pro SSD external hard drive via a reliable card reader like this one and then when I get home, move them over to my LaCie RAID external hard drive that stays connected to my desktop in my home office.

This ensures that I have a copy of the RAW images separately from any other device, which I suggest you do for every shoot. You never know when you may need to refer back to your RAW footage.
Since this is part of my work flow, when I then need to work in Lightroom, I will import a copy of those RAW images into Lightroom. This means there is a separate folder of the RAW images on my external hard drive that is the exact copy of the same RAW images within Lightroom.
For the sake of organization, all of this is saved within the same folder on my external hard drive. We’ll discuss that further shortly.
Import Process Steps
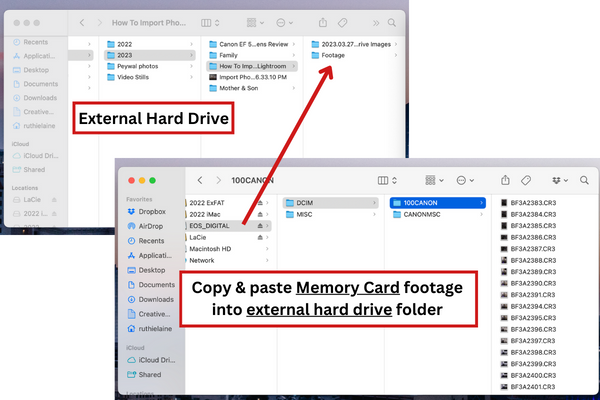
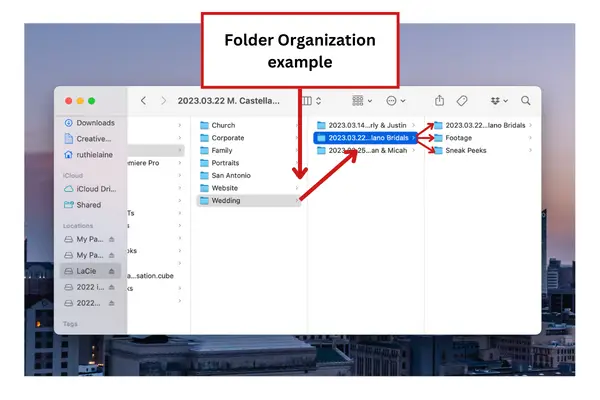
#1 Create a folder for your photo session
First, let’s talk folder structure. On your external drive, create a new folder that will house ALL the material (footage, edits, Lightroom catalog, etc.) for that particular session. This way, whenever you need to access something in regards to this shoot, you’ll know where to find that content. It won’t be scattered in different spots.
I usually date this folder as the YYYY.MM.DD and then a title describing the session (usually the client name).
#2 Create a FOOTAGE folder
Then within this folder, create a folder titled “FOOTAGE.” Within this folder will be the RAW files I pulled from my memory card.
I usually just copy and paste the folder with the raw images directly from the memory card into this folder.
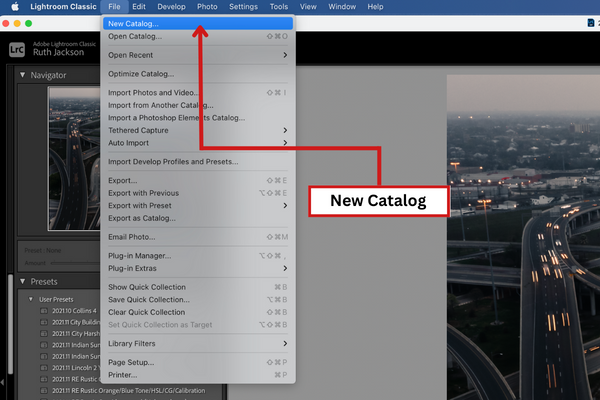
#3 Lightroom: Create a new Lightroom Catalog
The Lightroom catalog is a storage file that will contain the imported images and the editing work done to them within Lightroom. This is a necessary “catalog” of your photography images and work.
To create a new Lightroom catalog, first open up Lightroom. Then go to File and select New Catalog.

A dialog box will open titled Create Folder with New Catalog. You’ll be able to name this new catalog and select where it will be stored.

*My method: I will title the catalog with the date of the shoot as YYYY.MM.DD and then either the name of the client or description of the shoot. I will then store this in the folder that I created in step #1.
It’s the folder that is housing everything already. Again, so when I need to refer to these images, I know where to go quickly and everything is accessible in one place. The catalog, the raw images, edited images, etc.
#4 Import Options
When the new catalog is created, you can start to import raw files.
On the bottom left-hand side of your screen, within Lightroom, there should be an Import button and Export button.
*This is important: the only way you’ll be able to see these two buttons is when you are in the Library module.
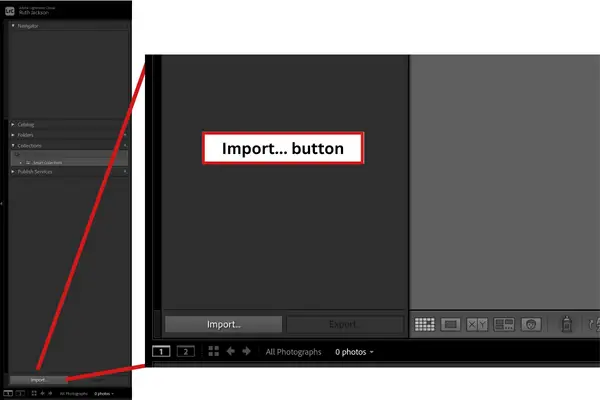
*Station break tip: If you don’t see these two buttons as options, go to the top right of your screen. There will be tabs titled Library, Develop, Map, Book, Slideshow, Print, Web, and then a cloud icon. Make sure Library is selected. It’s selected if it’s white and the others are grayed out, but also, you’ll know because you’ll be able to see the Import and Export buttons at the bottom left corner.
Moving on… select the Import button.
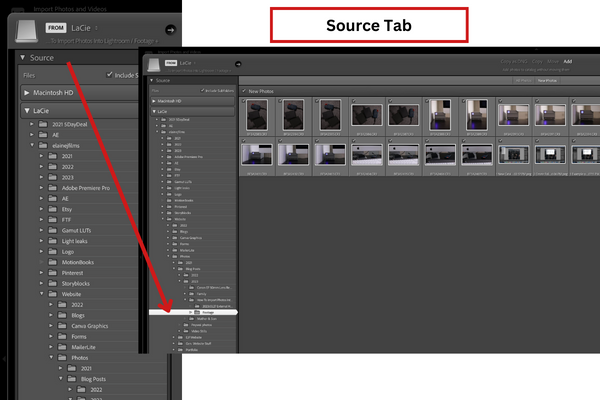
Lightroom will now show the import dialog box with a Source tab on the left-hand side. In the very center of the dialog box, it will say “Please select a source.” That is your clue you’re in the Import dialog box.

So go to the Source tab, and find the file you want to pull your images from. You’ll be able to see your computer’s hard drive, whatever that may be called like Macintosh HD for MacBook computers, and any other external hard drive you have connected to your computer.
Use the down arrows to sort through the selected hard drive to find the images. Select that file to highlight it and all the photos will show as previews in the center of the dialog box in a grid format.
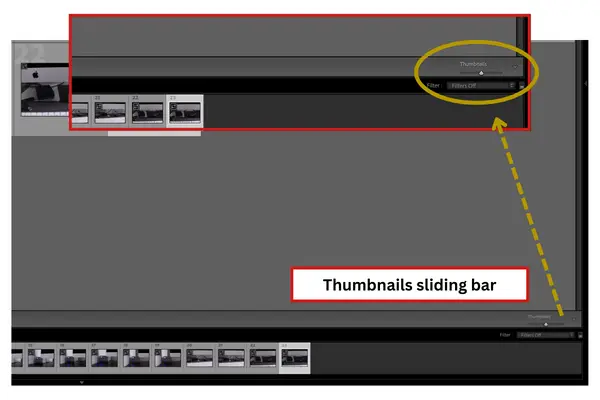
Select Images to Import
From there, you can select if you want all those images to be imported or just certain images.
You can use checkmarks in the upper lefthand corner of each image to select those images you want imported, or simply select All Photos or New Photos to import.
Get comfortable with the layout of this import dialog box grid view and the options available to help your selection process for import.
At the bottom of the grid view, within the toolbar, you can filter your images by toggling through the options listed under Sort.
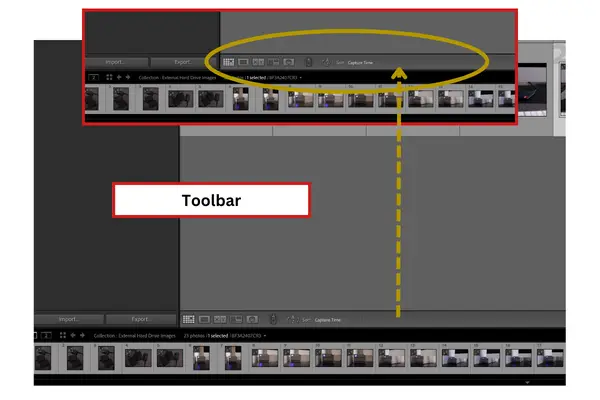
If the image previews are too small, use the thumbnails sliding bar at the bottom right hand corner, to increase the size of the images for better viewing.
You can also change the grid view to individual image views by using the keyboard shortcut E for loupe view or clicking on the icon at the bottom left corner of the image display area, and toggle through each individual image using the arrow keys on your keyboard. **Link to Lightroom overview
You can go back to the grid view by using the keyboard shortcut G or selecting the grid icon on the bottom left hand corner of the image display area.
Select the Method for the Import
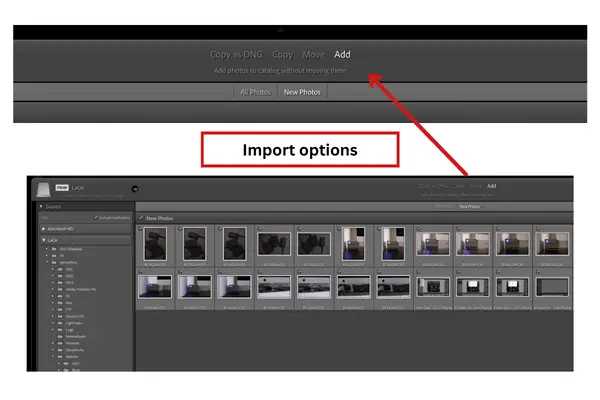
At the top center of the photo grid, you’ll see options to Copy as DNG, Copy, Move, or Add. When you select one of these options, a description of what that option will do will be described directly underneath.
- Copy as DNG: This is copying your images to a new location and importing them into the catalog as converted DNG files.
- Copy: Copying your images to a new location and adding them to the new catalog. The images in the original location will remain available while the same copied images are added the new catalog.
- Move: You’re moving your images to a new location and adding them to the catalog. They will no longer be in the location you move them from.
- Add: You’re adding your photos to the new catalog but leaving them in the place you already have them stored on your hard drive.
Importing from a hard drive
When you’re importing from a hard drive or any other external devices that already has the raw image files stored, select the Add option.
You will add your photos to your new catalog without moving the photos from where you already have them stored, as we’ve already described above.
On your right-hand side, you’ll see several options for File Handling and Apply During Importing Import.
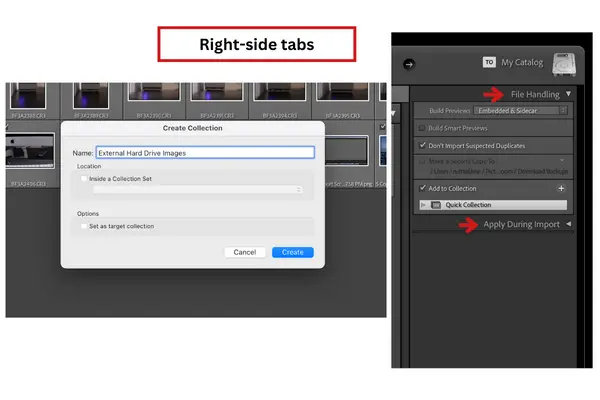
Under File Handling, you’ll have the option to build previews, i.e. the way you can quickly see your images, and add them to a collection for better image organization within the Lightroom catalog, amongst others.
Apply During Import
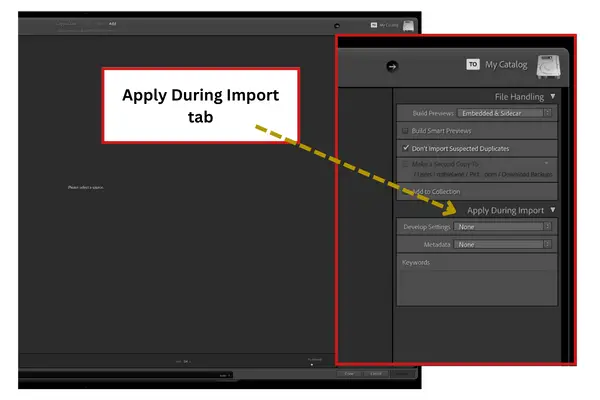
This gives you the option to apply some basic edits to your images immediately from import. Like adding certain presets or applying metadata to your images.
Doing these adjustments immediately from importing allows you to create an efficient work flow to your editing process.
When ready, go to the bottom corner of the Import dialog box and click the Import button. And it may take a few seconds (depending on the size of the import) to add all these new images, but all your images will then be ready to edit in your newly created catalog.

Importing from a memory card
Now let’s discuss the process when importing from a memory card.
When you’re importing from a memory card, you’ll need to do two things.
- Copy your raw images from the memory card onto your hard drive
- Add a copy of those images into your new catalog
Professional photographers will always tell you to save a copy of your raw images. So, when you’re importing directly from a memory card, you need to do this additional step before you start editing.
Let’s go slowly here, but follow closely to grasp everything.
First, like previously discussed, make sure you’ve already created a new catalog for these images you’re about to import. When that new catalog is created, open it to make sure when you import these photos, they import into the appropriately designated catalog.
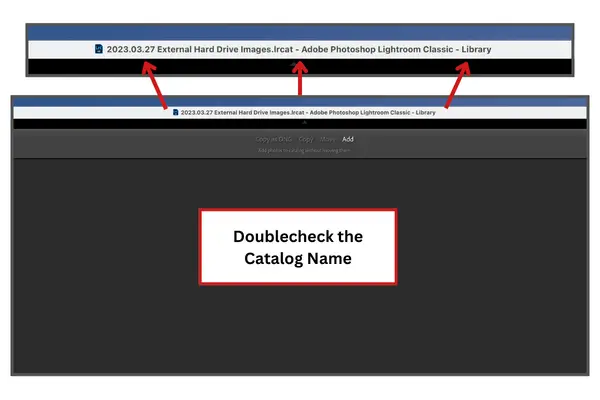
**You can doublecheck the name of the catalog you’re importing into by looking at the gray bar at very top of the screen within Lightroom. Whatever name is listed before .lrcat tells you the name of the catalog you are currently working in and if you start importing, which catalog you are importing in.
When your memory card is connected to your computer and you have Lightroom, the import window in Lightroom may automatically open up. You can change this default feature by going to preferences in Lightroom.
Now, when your memory drive is connected, you’ll be able to see it on the left-hand side of your Lightroom screen. For example, with Canon SanDisk memory cards, mine shows up as EOS_DIGITAL. From there I’m able to select which raw format images I’d like to import.
By using the drop-down menus of the selected memory card, I can go straight to the folder that has the images I’d like to sort through, which may be needed if you have multiple folders on your memory card.
In this case, select the option to Copy the images as opposed to the Add option. By selecting Copy, you are telling Lightroom to make a copy of these files and add them to the new catalog you are currently creating.
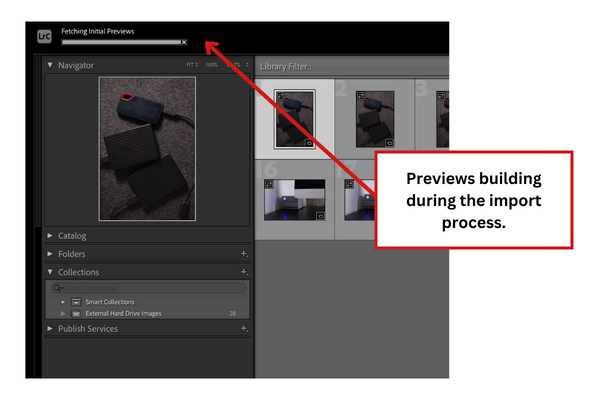
It may take a little time for the software to build previews, depending on how many images are on your memory card.
When done, take the time to review the image previews that come up in grid display in case you want to sort through and select certain images to import as opposed to adding all the images. You can of course, use the checkmark feature to check box and indicate which selected images will be the imported photos.
You can also apply a new preset to these images or other settings in the Apply During Import tab in the right-hand panel. Just as we discussed before.
Here’s the additional step when it comes to importing though. In the right-hand panel will now be a Destination panel. Click the drop-down arrow to see your options for where to save a copy of these raw files.
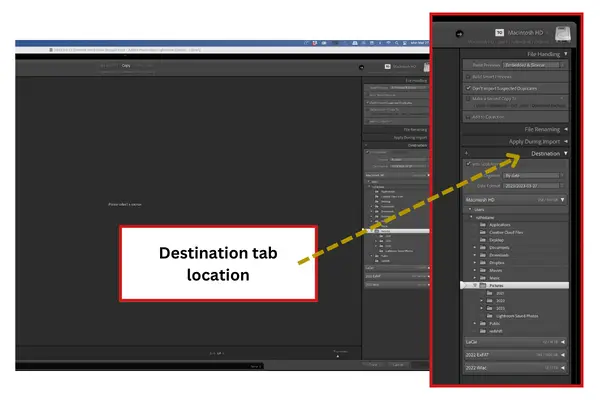
Depending on the hard drives you have connected to your computer, you will see all of those drives available as well as your computer hard drive. Use the drop-down menus to select which drive you’ll be adding a copy of these images too.
This is the key to the process of knowing exactly where you are saving these photos too. On the left side of the Destination panel is a plus (+) sign with a tiny down arrow. Click on this to create a new destination folder.
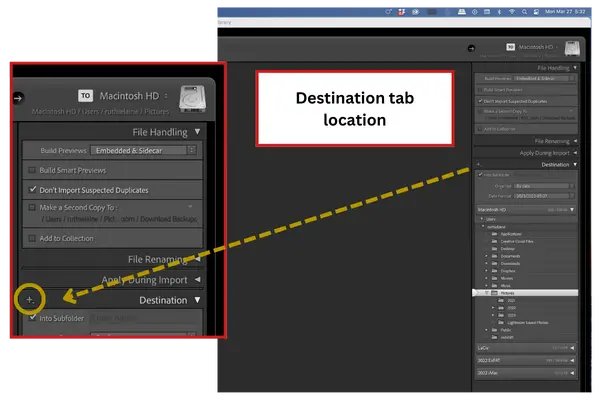
A window will open that will allow you to select the specific location on your computer hard drive or other external connected hard drive to save a copy of these photo files.
Once you have this created and named appropriately if you’re creating a new destination folder or have an already created folder selected, click import to upload those images.
When completed, you’ll have a copy of those exact raw files saved to a new location on your hard drive of choice and imported into a new Lightroom catalog.
Basic Tips for Newly Imported Raw Files
And finally… we’re done.
We just discussed two basic ways to import photos into Lightroom.
We could really go further in-depth about applying presents and meta-data, choosing selected images, creating collections and etc. But for the sake of trying to simplify an already detailed process into words, we’re keeping this blog focused on importing.
My advice from all of this is to create a process to your file structure and stick to it. Consistency is key to building an efficient work flow.
This will also help reduce the risk of forgetting where these raw images are should you need to access them again in the future.
To summarize everything into a real-life example, here’s a video of my importing process.
And if you’re up for it, sign up for my newsletter.
I’ll be launching a beginner photography course in the winter season of this year, 2023! I’m super excited about it because it’ll be all the basic steps I have learned in developing my photography skills and business.
I believe that if I can start this journey in my mid-30s, anybody can do it. You just need the right tools and knowledge to help you get started.
And if you found this helpful, leave and comment and let me know! Your feedback gives me important info as to what content to keep writing on. And I greatly appreciate it.
‘Til then, best wishes.
